Honda Odyssey 2004. Manual - part 145


  Index      Honda     Honda Odyssey 2004 - service repair manual 2004 year


Search            


Content   ..  143  144  145  146   ..


Honda Odyssey 2004. Manual - part 145


01

S0X4AZAK77100091456FAAT00

DTC P1456

’02-04 Models:

Special Tools Required

Fuel Fill Cap Check

YES

NO

YES

NO

EVAP Canister Purge Valve Test

YES

NO

11-278

EVAP System

DTC Troubleshooting (cont’d)

A

A973X-041-
XXXXX

EVAP Control

System Leakage (fuel tank system)

The fuel system is designed to allow specified
maximum vacuum and pressure conditions. Do not
deviate from the vacuum and pressure tests as
indicated in these procedures. Excessive pressure/
vacuum would damage the EVAP components or cause
eventual fuel tank failure.

Vacuum pump/gauge, 0

30 in.Hg A973X-041-XXXXX

NOTE: If DTC P0461 is stored at the same time as DTC
P1456, troubleshoot P0461 first, then recheck for DTC
P1456.

This is a two trip code; once cleared, it cannot be
reproduced in one trip. Also, certain specific driving
and ambient conditions must occur before the PCM will
complete the system checks. Additional test drives may
still not meet the specific conditions needed to
reproduce the code.

Follow these troubleshooting procedures carefully to
ensure the integrity of the system and to confirm the
cause of the problem or code.

NOTE: Fresh fuel has a higher volatility that will create
greater pressure/vacuum. The optimum condition for
testing is fresh fuel and less than a full tank of gas. If
possible, to assist in leak detection, add 1 gallon of
fresh fuel to the tank (as long as it will not fill the tank),
just before starting these procedures.

1. Check the fuel fill cap. It must say ‘‘If not tightened

3 clicks check engine light may come on.’’

Go to step 2.

Replace or tighten the cap.

2. Check the fuel fill cap seal.

Replace the fuel fill cap (gray or black

colored cap).

The fuel fill cap is OK. Go to step 3.

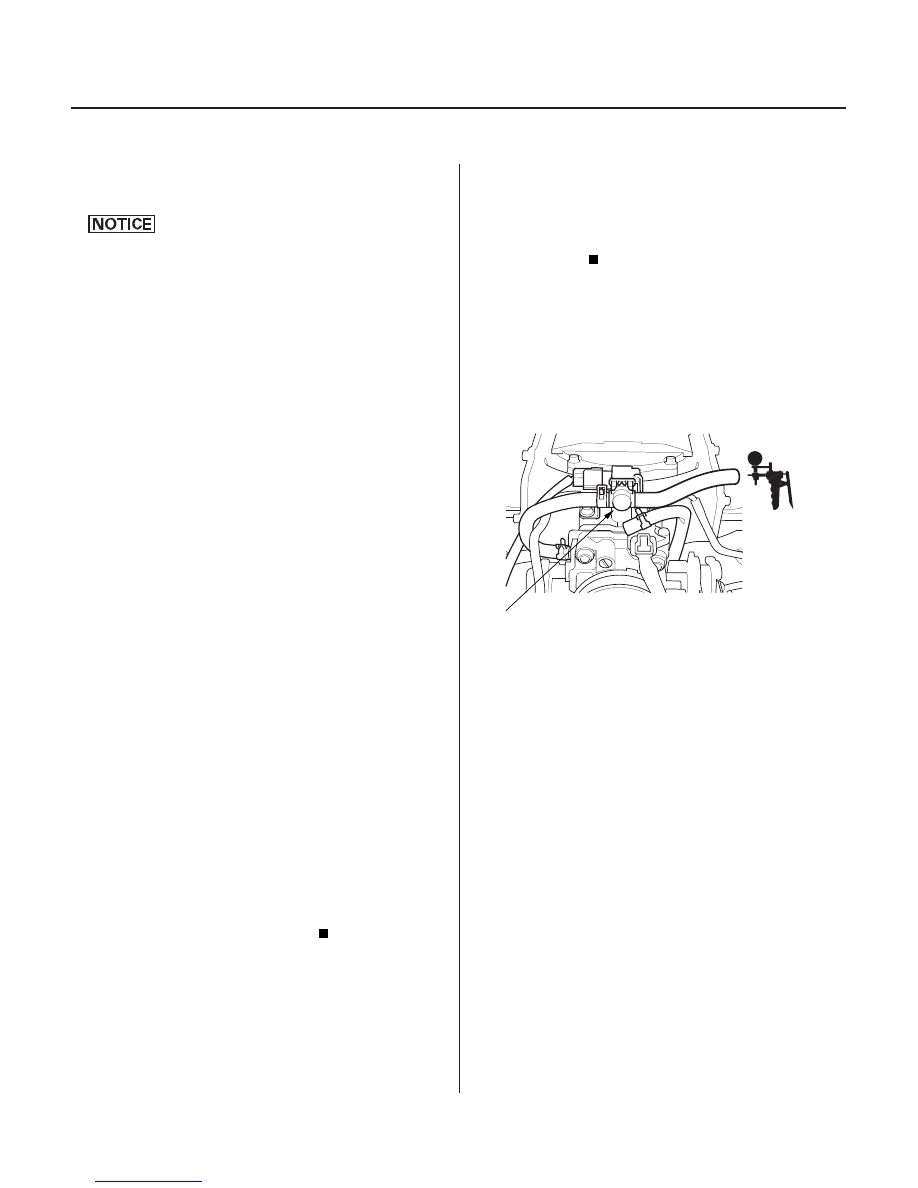
3. Disconnect the vacuum hose from the EVAP

canister purge valve (A), and connect a vacuum
pump to the hose.

4. Turn the ignition switch ON (II).

5. Apply vacuum to the hose.

The EVAP canister purge valve is OK. Go to

step 11.

Go to step 6.

6. Turn the ignition switch OFF.

7. Disconnect the EVAP canister purge valve 2P

connector.

Is the cor r ect f uel f ill cap installed and pr oper ly
tightened?

Is the f uel f ill cap seal missing or damaged?

Does the valve hold vacuum?

03/07/29 09:26:11 61S0X050_110_0278

02

03

03

*02

YES

NO

YES

NO

EVAP Bypass Solenoid Valve Test

YES

NO

11-279

EVAP CANISTER PURGE VALVE

PCS (RED/YEL)

PCS (RED/YEL)

EVAP CANISTER PURGE
VALVE 2P CONNECTOR

A973X-041-
XXXXX

A

PCM CONNECTOR A (32P)

2WBS (BLU)

JUMPER WIRE

8. Check for continuity between EVAP canister purge

valve 2P connector terminal No. 2 and body ground.

Go to step 9.

Replace the EVAP canister purge valve.

9. Disconnect PCM connector A (32P).

10. Check for continuity between EVAP canister purge

valve 2P connector terminal No. 2 and body ground.

Repair short in the wire between the EVAP

canister purge valve and the PCM (A6).

Substitute a known-good PCM and recheck

(see page 11-5). If the symptom/indication goes
away, replace the original PCM.

11. Disconnect both vacuum hoses from the EVAP two

way valve (A), and connect a vacuum pump to the
canister port on the two way valve.

12. Turn the bypass solenoid valve on with the HDS, or

connect PCM connector terminal A3 to body
ground with a jumper wire.

13. Turn the ignition switch ON (II).

14. Apply vacuum to the hose.

Go to step 15.

Go to step 20.

15. Turn the ignition switch OFF.

16. Disconnect the EVAP bypass solenoid valve 2P

connector.

(cont’d)

Wire side of female terminals

Wire side of female terminals

Wire side of female terminals

Is ther e continuity?

Is ther e continuity?

Does the valve hold vacuum?

03/07/29 09:26:12 61S0X050_110_0279

11

*01

08

05

YES

NO

YES

NO

YES

NO

11-280

EVAP System

DTC Troubleshooting (cont’d)

EVAP BYPASS SOLENOID
VALVE 2P CONNECTOR

2WBS (BLU)

EVAP BYPASS SOLENOID
VALVE 2P CONNECTOR

IG1 (BLK/YEL)

A

B

A

A973X-041-XXXXX

17. Check for continuity continuity between EVAP

bypass solenoid valve 2P connector terminal No. 2
and body ground.

Go to step 18.

Repair open in the wire between the EVAP

bypass solenoid valve and the PCM (A3).

18. Turn the ignition switch ON (II).

19. Measure voltage between EVAP bypass solenoid

valve 2P connector terminal No. 1 and body ground.

Replace the EVAP bypass solenoid valve (A)

and the O-rings (B).

Repair open in the wire between the EVAP

bypass solenoid valve and No. 6 ECU (PCM)
CRUISE CONTROL (15A) fuse.

20. Plug the upper port (A) of the EVAP two way valve.

21. While monitoring the FTP sensor voltage with the

HDS, or while measuring the voltage between PCM
connector terminals A29 and C18, slowly pump the
vacuum pump until the voltage drops to about
1.5 V.

The EVAP bypass solenoid valve/EVAP two

way valve is OK. Go to step 22.

Repair leakage from the EVAP bypass

solenoid valve, EVAP two way valve, FTP sensor, or
O-rings.

Wire side of female terminals

Wire side of female terminals

Is ther e continuity?

Is ther e batter y voltage?

Does the voltage dr op to 1.5 V and hold f or at
least 20 seconds?

03/07/29 09:26:13 61S0X050_110_0280

06

07

08

09

EVAP Canister Vent Shut Valve Test

YES

NO

YES

NO

YES

NO

11-281

A

A973X-041-XXXXX

EVAP CANISTER VENT
SHUT VALVE 2P CONNECTOR

VSV
(LT GRN/WHT)

B

A

EVAP CANISTER VENT
SHUT VALVE 2P CONNECTOR

VSV
(LT GRN/WHT)

22. Disconnect the vacuum hose from the EVAP

canister filter (A), and connect a vacuum pump to
the hose.

23. Turn the ignition switch ON (II).

24. Apply vacuum to the hose with 5 strokes of the

pump.

Go to step 25.

The EVAP canister vent shut valve is OK. Go

to step 30.

25. Turn the ignition switch OFF.

26. Disconnect the EVAP canister vent valve 2P

connector.

27. Check for continuity between EVAP canister vent

shut valve 2P connector terminal No. 2 and body
ground.

Go to step 28.

Replace the EVAP canister vent shut valve (A)

and O-ring (B).

28. Disconnect PCM connector A (32P).

29. Check for continuity between EVAP canister vent

shut valve 2P connector terminal No. 2 and body
ground.

Repair short in the wire between the EVAP

canister vent shut valve and the PCM (A4).

Substitute a known-good PCM and recheck

(see page 11-5). If the symptom/indication goes
away, replace the original PCM.

(cont’d)

Wire side of female terminals

Wire side of female terminals

Does the valve hold vacuum?

Is ther e continuity?

Is ther e continuity?

03/07/29 09:26:14 61S0X050_110_0281


Content   ..  143  144  145  146   ..