Honda Odyssey 2004. Manual - part 129
−
−
−
−
−
−
−
−
03
04
+
YES
NO
YES
NO
YES
NO
YES
NO
11-214
Fuel Supply System
PGM-FI Main Relay Circuit Troubleshooting (cont’d)
PCM CONNECTORS
A (31P)
E (31P)
PG1 (BLK)
IMOFPR
(GRN/YEL)
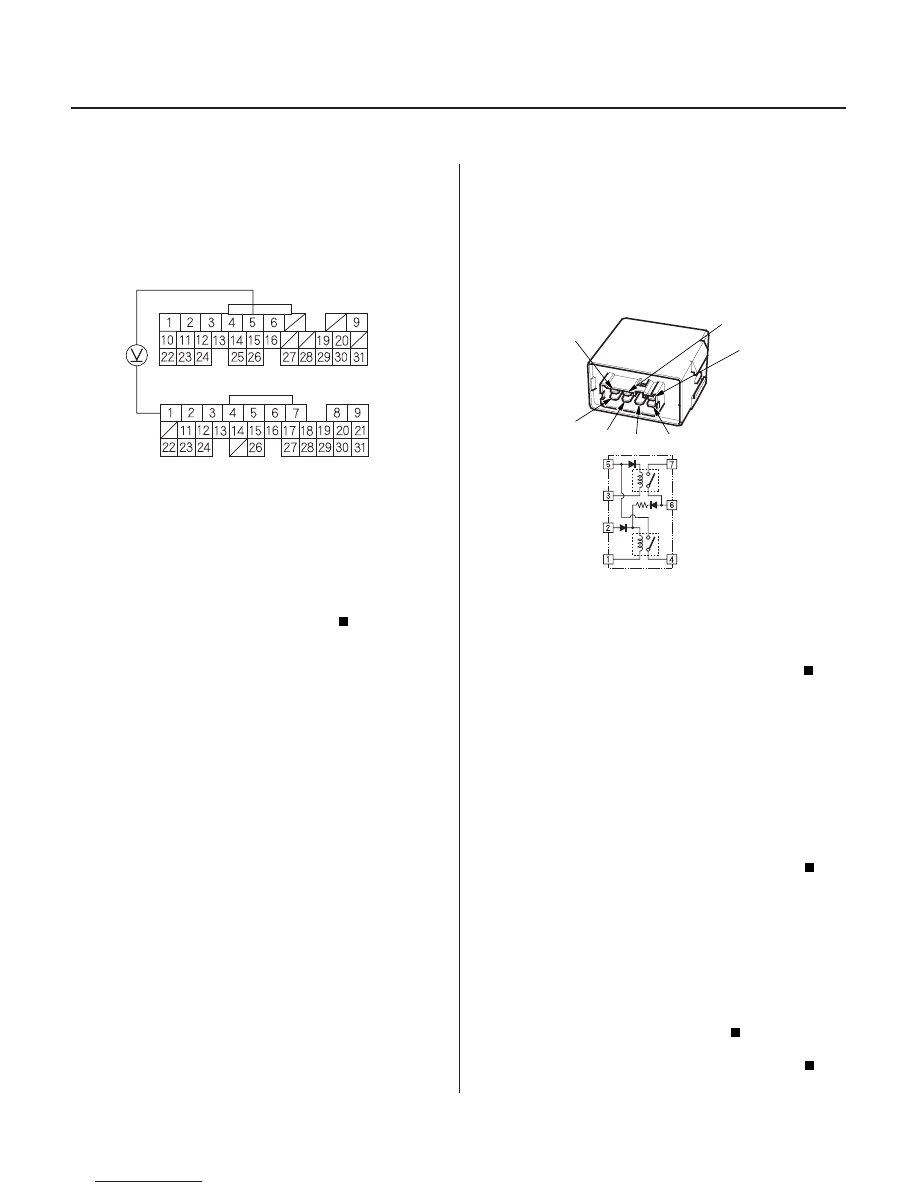
No. 1
No. 2
No. 3
No. 4
No. 5
No. 6
No. 7
To IGN. 1
To GROUND
To ST. SWITCH
To PCM
(E1)
To FUEL PUMP
To PCM
(A2, A3)
To BAT (
)
16. Turn the ignition switch OFF, then ON (II) again.
17. Measure voltage between PCM connector
terminals A5 and E1 within the first 2 seconds after
the ignition switch is turned ON (II).
The PGM-FI main relay may be faulty. Go to
step 18.
Substitute a known-good PCM and recheck
(see page 11-5). If the prescribed voltage is now
available, replace the original PCM.
18. Remove the PGM-FI main relay.
19. Connect battery power to PGM-FI main relay 7P
connector terminal No. 2, and connect PGM-FI
main relay 7P connector terminal No. 1 to ground.
Then check for continuity between PGM-FI main
relay 7P connector terminals No. 5 and No. 4.
NOTE: Use the terminal numbers shown. Ignore
the terminal numbers molded into the relay.
Go to step 20.
20. Connect battery power to PGM-FI main relay 7P
connector terminal No. 5, and connect PGM-FI
main relay 7P connector terminal No. 3 to ground.
Then check for continuity between PGM-FI main
relay 7P connector terminals No. 7 and No. 6.
Go to step 21.
Replace the PGM-FI main relay and retest.
21. Connect battery power to PGM-FI main relay 7P
connector terminal No. 6, and connect ground to
PGM-FI main relay 7P connector terminal No. 1.
Then check for continuity between PGM-FI main
relay 7P connector terminals No. 5 and No. 4.
The PGM-FI main relay is OK.
Replace the PGM-FI main relay and retest.
Wire side of female terminals
Is ther e 1.0 V or less?
Is ther e continuity?
Is ther e continuity?
Is ther e continuity?
03/07/29 09:24:23 61S0X050_110_0214
Replace the PGM-FI main relay and retest.