Honda Odyssey 2004. Manual - part 46


  Index      Honda     Honda Odyssey 2004 - service repair manual 2004 year


Search            


Content   ..  44  45  46  47   ..


Honda Odyssey 2004. Manual - part 46


*04

*05

*06

6-24

Cylinder Head

Timing Belt Installation (cont’d)

C

D

B

A

A
8 N·m (0.8 kgf·m,
6 lbf·ft)

B

A

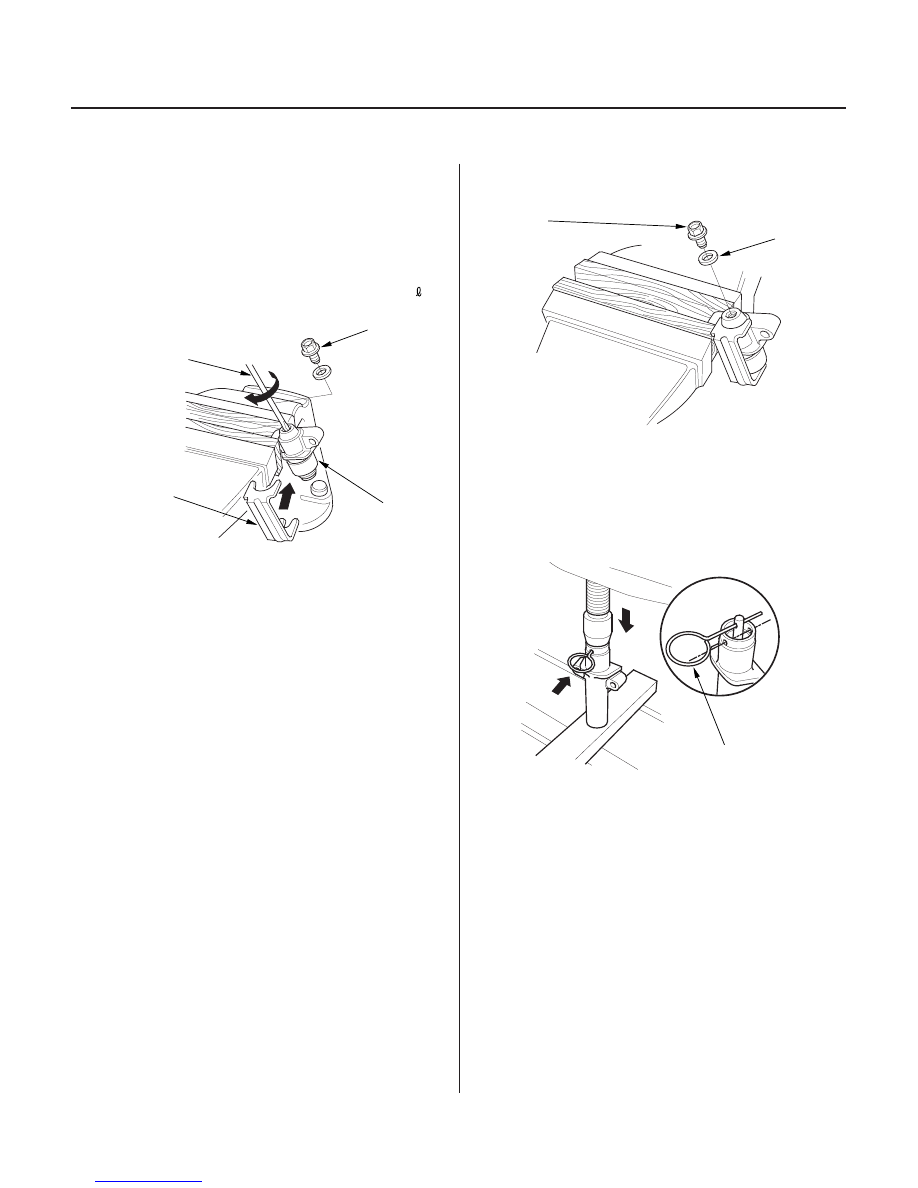
6. Hold the auto-tensioner (A) with the maintenance

bolt pointing up. Loosen and remove the
maintenance bolt (B) (1999 model).

NOTE: Handle the auto-tensioner carefully so the
oil inside does not spill or leak. If any of the oil has
spilled or leaked out of the auto-tensioner, refill it
with 5W-30 motor oil. The total capacity is 6.5 m
(0.22 fl oz).

7. Clamp the boss of the auto-tensioner in a soft-

jawed vise. Do not grip the housing of the auto-
tensioner (1999 model).

8. Insert a flat blade screwdriver (C) into the

maintenance hole. Place the holder (D) (P/N
14540-P8A-A01) on the auto-tensioner while
turning the screwdriver clockwise to compress the
bottom (1999 model).

NOTE: Take care not to damage the threads or the
gasket contact surface with the screwdriver.

9. Reinstall the maintenance bolt (A). Always use a

new gasket (B) (1999 model).

10. Make sure no oil is leaking around the maintenance

bolt.

11. Align the holes on the rod and housing of the auto-

tensioner with a pin of 1.5 mm (0.06 in.) diameter
(A) (2000-2004 models).

12. Set the auto-tensioner on the hydraulic press, then

slowly compress the auto-tensioner to insert the
pin through the housing and the rod (2000-2004
models).

NOTE: The compression pressure should not
exceed 9,800 N (1,000 kgf, 2,200 lb).

03/07/29 09:10:48 61S0X050_060_0024

02

*07

*34

*08

1999 model:

2000-2004 models:

6-25

6 x 1.0 mm
12 N·m (1.2 kgf·m,
8.7 lbf·ft)

6 x 1.0 mm
12 N·m (1.2 kgf·m, 8.7 lbf·ft)

E

F

A

D

C

B

13. Install the auto-tensioner.

NOTE: Make sure the holder (pin for ’00-04 models)
stays in place.

14. Screw the battery clamp bolt in as shown to hold

the timing belt adjuster in its current position.
Tighten it by hand, do not use a wrench.

15. Apply liquid thread lock to the idle pulley bolt, then

loosley install the idler pulley.

16. Install the timing belt in a counter clockwise

sequence starting with the drive pulley.

–1 Drive pulley (A).
–2 Idler pulley (B).
–3 Front camshaft pulley (C).
–4 Water pump pulley (D).
–5 Rear camshaft pulley (E).
–6 Adjusting pulley (F).

(cont’d)

03/07/29 09:10:49 61S0X050_060_0025

*09

*10

*11

1999 model:

2000-2004 models:

6-26

Cylinder Head

Timing Belt Installation (cont’d)

10 x 1.25 mm
44 N·m (4.5 kgf·m, 33 lbf·ft)

17. Tighten the idler pulley bolt.

18. Remove the holder (pin for 2000-2004 models)

from the auto-tensioner.

19. Remove the battery clamp bolt from the back cover.

03/07/29 09:10:49 61S0X050_060_0026

*12

*13

*14

*15

6-27

6 x 1.0 mm
12 N·m (1.2 kgf·m,
8.7 lbf·ft)

10 x 1.25 mm
44 N·m (4.5 kgf·m, 33 lbf·ft)

B

C

A

6 x 1.0 mm
12 N·m (1.2 kgf·m, 8.7 lbf·ft)

A

B

20. Install the engine mount bracket.

21. Install the timing belt guide plate as shown.

22. Install the lower cover (A), front upper cover (B)

and rear upper cover (C).

23. Install the crankshaft pulley (see page 6-18).

24. Rotate the crankshaft pulley about five or six turns

clockwise so the timing belt positions on the
pulleys.

25. Turn the crankshaft pulley so its white mark (A)

lines up with the pointer (B).

(cont’d)

03/07/29 09:10:50 61S0X050_060_0027


Content   ..  44  45  46  47   ..