Honda Element. Manual - part 736


  Index      Honda     Honda Element - service repair manual 2007-2008 year


Search            


Content   ..  734  735  736  737   ..


Honda Element. Manual - part 736


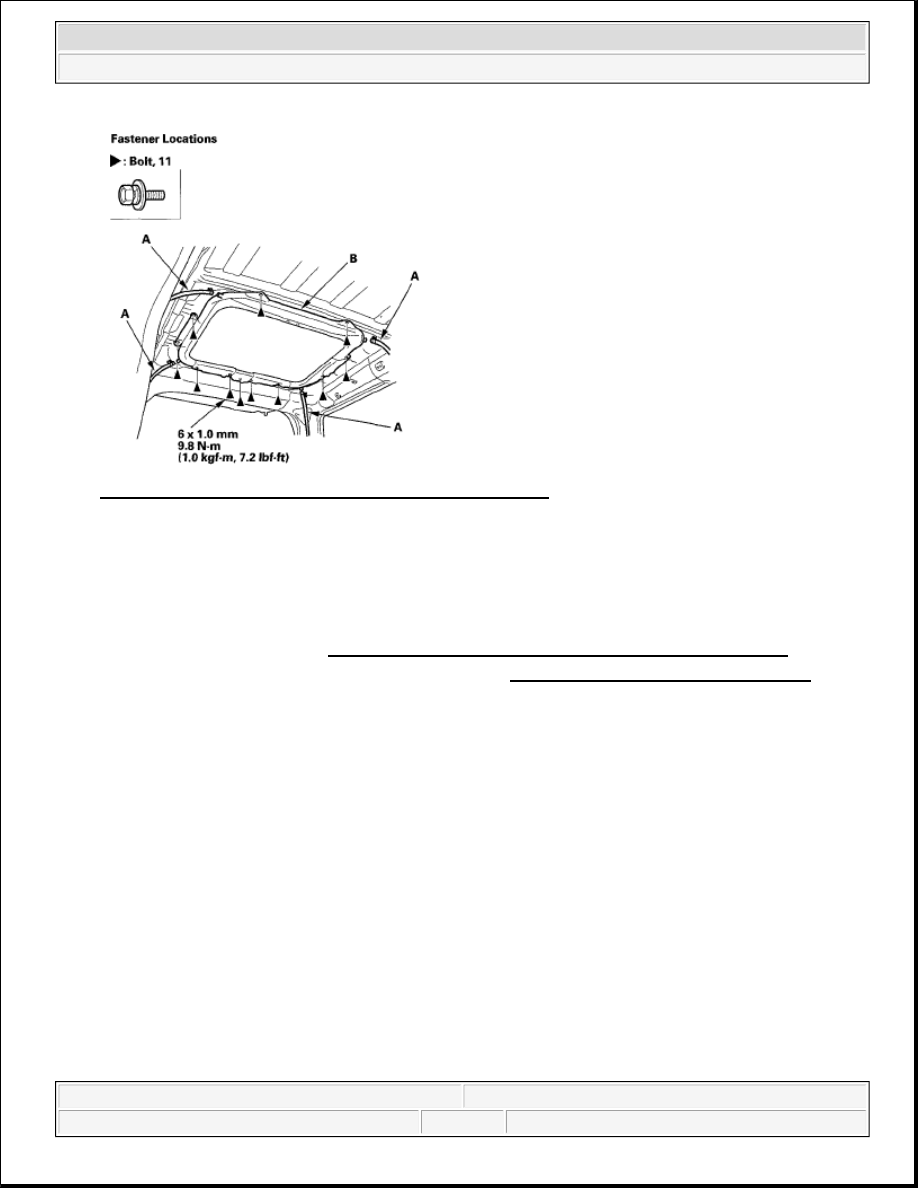
Fig. 9: Identifying Drain Tubes With Torque Specification 
Courtesy of AMERICAN HONDA MOTOR CO., INC. 

3. With an assistant holding the frame (B), remove the bolts, then remove the frame.  

4. Carefully remove the frame through the hatch opening. Take care not to scratch the interior trim and 

body, or tear the seat cover.  

5. Remove these items: 

Rear side trim panel (see TRIM REMOVAL/INSTALLATION - REAR SIDE AREA )  

Rear seat belt retractor and seat belt protector (see REAR SEAT BELT REPLACEMENT )  

6. Remove the drain valve (A) from the body, and disconnect the front drain tube (B) and rear drain tube 

(C). 


2007 Honda Element EX 

2007-08 ACCESSORIES AND EQUIPMENT Skylight - Element


Fig. 10: Identifying Front Drain Tube And Rear Drain Tube 
Courtesy of AMERICAN HONDA MOTOR CO., INC. 

7. Detach the clips (D) securing the rear drain tube, then pull the tube out.  

8. Tie a string to the end of the front drain tube, then pull the tube down out of the C-pillar.  

9. Install the frame and drain tube in the reverse order of removal, and note these items: 

Before installing the frame, clear the drain tubes and drain valves using compressed air.  

Route the drain tubes behind the side curtain airbag tether straps (see INSTALLATION ).  

Check the frame seal.  

Clean the surface of the frame.  

When connecting the drain tube, slide it over the frame nozzle at least 10 mm (0.39 in.).  

Install the tube clip (A) on the drain tube (B) as shown. 

Fig. 11: Identifying Tube Clip On Drain Tube 
Courtesy of AMERICAN HONDA MOTOR CO., INC. 

10. Check for water leaks. Let the water run freely from a hose without a nozzle. Do not use a high-pressure 

spray.  


2007 Honda Element EX 

2007-08 ACCESSORIES AND EQUIPMENT Skylight - Element


DEFLECTOR REPLACEMENT

1. Remove the frame (see FRAME AND DRAIN TUBE REPLACEMENT ).  

2. Remove the screws (A, B), then remove the deflector (C). Take care not to scratch the frame. 

Fig. 12: Identifying Deflector Screws With Torque Specification 
Courtesy of AMERICAN HONDA MOTOR CO., INC. 

3. Install the deflector in the reverse order of removal.  

GLASS BRACKET RECEIVER REPLACEMENT 

1. Remove the frame (see FRAME AND DRAIN TUBE REPLACEMENT ).  

2. Remove the deflector (see DEFLECTOR REPLACEMENT ).  

3. Remove the screws (A, B), then remove the upper receiver (C). 


2007 Honda Element EX 

2007-08 ACCESSORIES AND EQUIPMENT Skylight - Element


Fig. 13: Identifying Upper Receiver Screws With Torque Specifications 
Courtesy of AMERICAN HONDA MOTOR CO., INC. 

4. Remove the lower receiver (A) from the frame. 

Fig. 14: Identifying Lower Receiver From Frame 
Courtesy of AMERICAN HONDA MOTOR CO., INC. 

5. Install the receivers in the reverse order of removal, and apply multipurpose grease to the upper receiver 

surface (A) and lower receiver surface (B) as indicated by the arrows. 

Fig. 15: Applying Multipurpose Grease To Upper Receiver Surface And Lower Receiver Surface 
Courtesy of AMERICAN HONDA MOTOR CO., INC.


2007 Honda Element EX 

2007-08 ACCESSORIES AND EQUIPMENT Skylight - Element


Content   ..  734  735  736  737   ..