Honda Element. Manual - part 387


  Index      Honda     Honda Element - service repair manual 2007-2008 year


Search            


Content   ..  385  386  387  388   ..


Honda Element. Manual - part 387


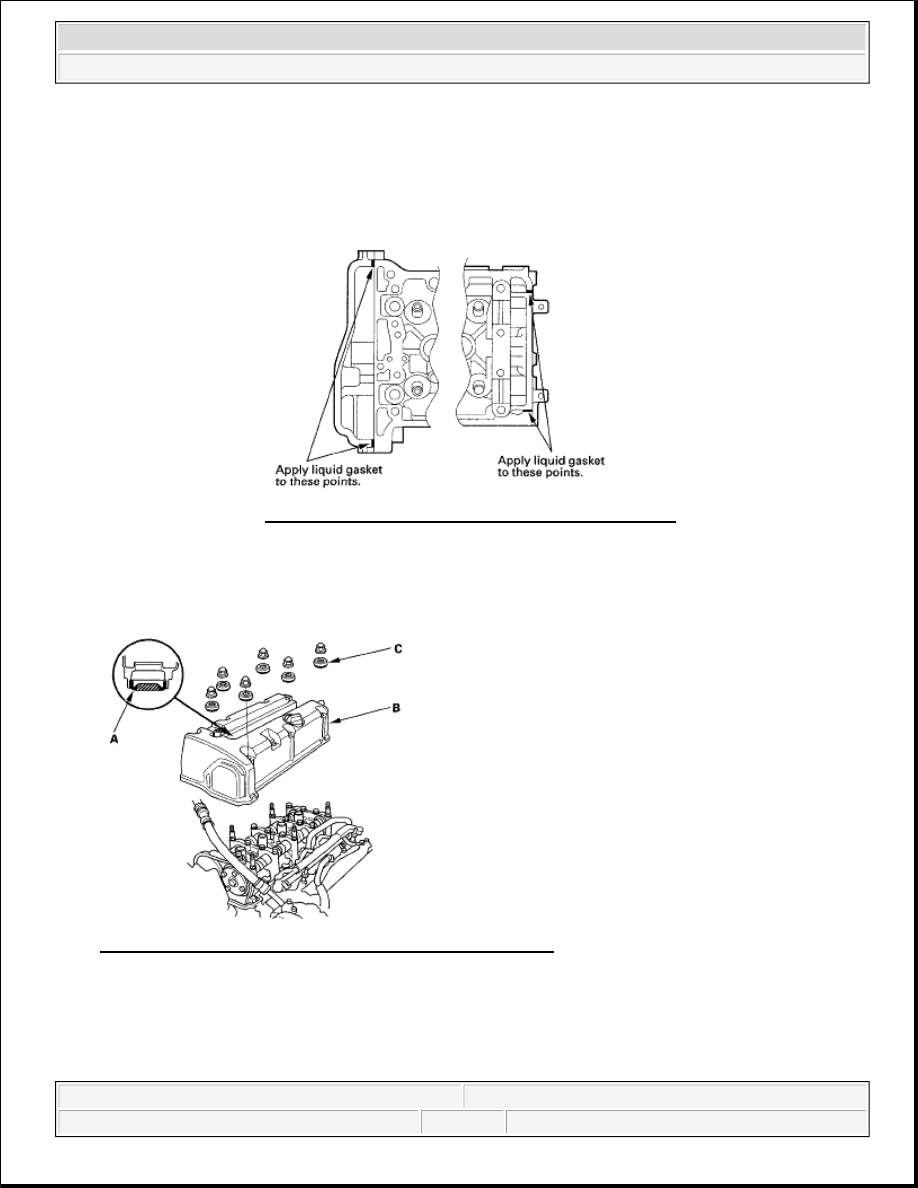
5. Set the spark plug seals (A) on the spark plug tubes. Place the cylinder head cover (B) on the cylinder 

head, then slide the cover slightly back and forth to seat the head cover gasket. 

Fig. 68: Identifying Spark Plug Seals On Spark Plug Tubes 
Courtesy of AMERICAN HONDA MOTOR CO., INC. 

6. Inspect the cover washers (C). Replace any washer that is damaged or deteriorated.  

7. Torque the bolts in three steps. In the final step torque all bolts, in sequence, to 12 N.m (1.2 kgf.m, 8.8 

lbf.ft). 

NOTE:

If you apply liquid gasket P/N 08718-0012, the component must be 
installed within 4 minutes.  

If too much time has passed after applying the liquid gasket, remove 
the old liquid gasket and residue, then reapply new liquid gasket. 

Fig. 67: Identifying Liquid Gasket Applying Area 
Courtesy of AMERICAN HONDA MOTOR CO., INC. 


2007 Honda Element EX 

2007-2008 ENGINE Cylinder Head - Element


Fig. 69: Identifying Tightening Sequence Of Bolts 
Courtesy of AMERICAN HONDA MOTOR CO., INC. 

8. Install the dipstick (A) and breather hose (B). 

Fig. 70: Identifying Dipstick And Breather Hose With Bolts With Torque Specifications 
Courtesy of AMERICAN HONDA MOTOR CO., INC. 

9. Torque the bolt (C) securing the power steering (P/S) hose bracket.  

10. Torque the two bolts (D) securing the vacuum line.  

11. Install the four ignition coils (see IGNITION COIL REMOVAL/INSTALLATION ).  

12. Check that all tubes, hoses, and connectors are installed correctly.  

13. Install the engine cover. 


2007 Honda Element EX 

2007-2008 ENGINE Cylinder Head - Element


Fig. 71: Identifying Engine Cover Nuts With Torque Specification 
Courtesy of AMERICAN HONDA MOTOR CO., INC. 

14. After assembly, wait at least 30 minutes before filling the engine with oil.  

CYLINDER HEAD REMOVAL 

1. Relieve the fuel pressure (see FUEL PRESSURE RELIEVING ).  

2. Drain the engine coolant (see COOLANT CHECK ).  

3. Remove the drive belt (see DRIVE BELT INSPECTION ).  

4. Disconnect the mass air flow (MAF) sensor/intake air temperature (IAT) sensor connector (A). 

NOTE:

Use fender covers to avoid damaging the painted surfaces.  

To avoid damaging the wires and terminals, unplug the wiring connectors 
carefully while holding the connector portion.  

To avoid damaging the cylinder head, wait until the engine coolant 
temperature drops below 100°F (38°C) before loosening the cylinder head 
bolts.  

Mark all wiring and hoses to avoid misconnection. Also, be sure that they 
do not contact other wiring or hoses, or interfere with other parts.  


2007 Honda Element EX 

2007-2008 ENGINE Cylinder Head - Element


Fig. 72: Identifying Mass Air Flow (MAF) Sensor/Intake Air Temperature (IAT) Sensor Connector
Courtesy of AMERICAN HONDA MOTOR CO., INC.
 

5. Disconnect the vacuum hose (B) and breather pipe (C), then remove the intake air duct (D).  

6. Remove the quick-connect fitting cover (A), then disconnect the fuel feed hose (B) (see FUEL 

LINE/QUICK-CONNECT FITTING REMOVAL ). 

Fig. 73: Identifying Vacuum Hose And Breather Pipe 
Courtesy of AMERICAN HONDA MOTOR CO., INC. 

7. Remove the bolt securing the connecting pipe support bracket from the engine block. 


2007 Honda Element EX 

2007-2008 ENGINE Cylinder Head - Element


Content   ..  385  386  387  388   ..