Honda Element. Manual - part 287


  Index      Honda     Honda Element - service repair manual 2007-2008 year


Search            


Content   ..  285  286  287  288   ..


Honda Element. Manual - part 287


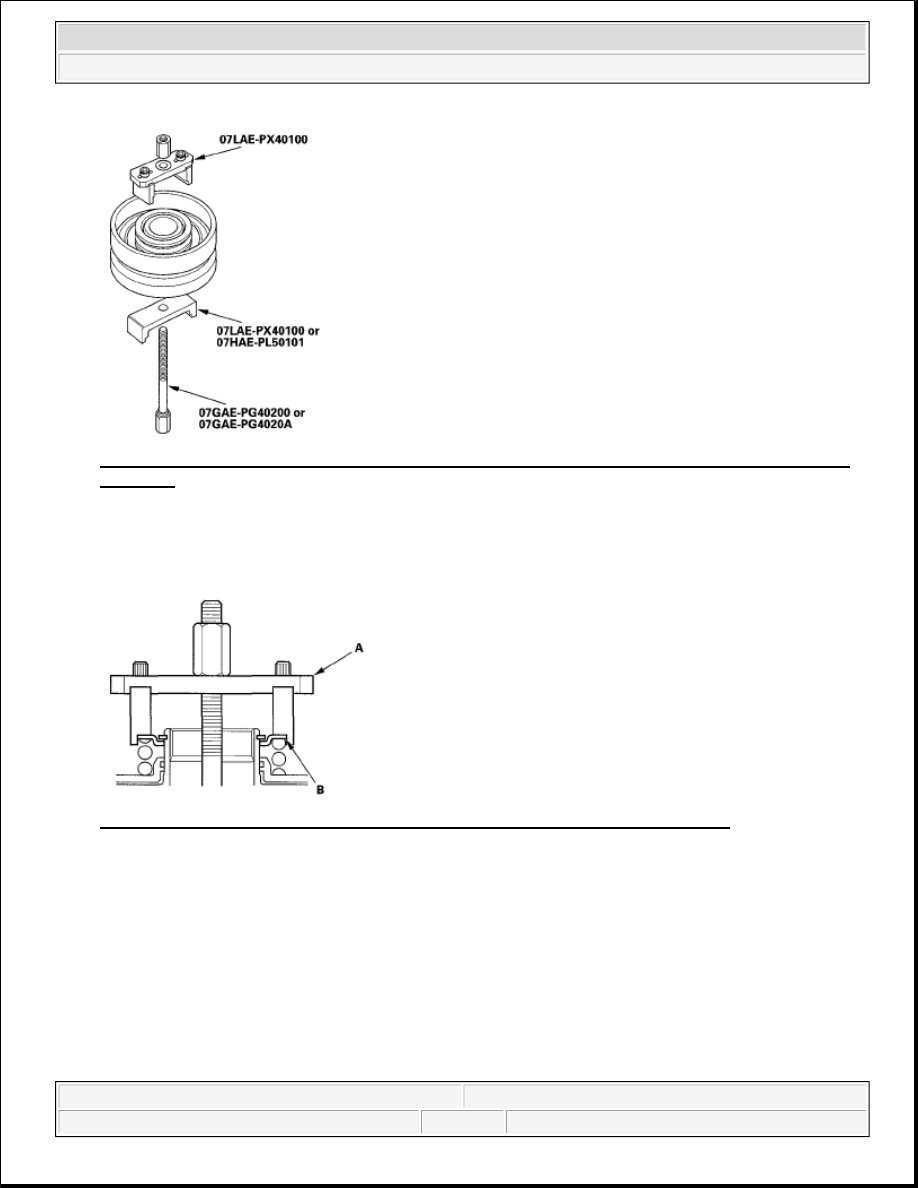
Fig. 509: Identifying Clutch Spring Compressor Attachment And Clutch Spring Compressor Bolt 
Assembly
 
Courtesy of AMERICAN HONDA MOTOR CO., INC. 

7. Be sure the clutch spring compressor attachment (A) is adjusted to have full contact with the spring 

retainer (B) on the 4th and 5th clutches. 

Fig. 510: Identifying Clutch Spring Compressor Attachment And Spring Retainer 
Courtesy of AMERICAN HONDA MOTOR CO., INC. 

8. Set the clutch spring compressor attachment (A) on the spring retainer (B) of the 1st, 2nd, and 3rd 

clutches in such a way that it compresses the clutch return spring (C). 


2007 Honda Element EX 

2007-2008 TRANSMISSION Automatic Transmission - Element


Fig. 511: Identifying Clutch Spring Compressor Attachment, Spring Retainer And Clutch Return 
Spring
 
Courtesy of AMERICAN HONDA MOTOR CO., INC. 

9. If either end of the clutch spring compressor attachment is set over an area of the spring retainer which is 

unsupported by the return spring, the retainer may be damaged. 

Fig. 512: Identifying Clutch Spring Compressor Attachment On Spring Retainer 
Courtesy of AMERICAN HONDA MOTOR CO., INC. 

10. Compress the return spring. 

Fig. 513: Compressing Return Spring


2007 Honda Element EX 

2007-2008 TRANSMISSION Automatic Transmission - Element


Courtesy of AMERICAN HONDA MOTOR CO., INC.

11. Install the snap ring with snap ring pliers. 

Fig. 514: Installing Snap Ring With Snap Ring Pliers 
Courtesy of AMERICAN HONDA MOTOR CO., INC. 

12. Remove the clutch spring compressor attachment and clutch spring compressor bolt assembly.  

13. Install the waved spring (A) in the 1st clutch drum (B). Install the clutch flat-plate (C), then starting with 

the clutch disc, alternately install the clutch discs (D) (5) and clutch wave-plates (E) (4), then install the 
clutch end-plate (F) with the flat side toward the disc. 

Fig. 515: Disassembled View Of 1st Clutch Drum 
Courtesy of AMERICAN HONDA MOTOR CO., INC. 

14. Install the waved spring (A) in the 2nd clutch drum (B). Install the flat-plate (C), then starting with the 

clutch disc, alternately install the clutch discs (D) (6) and wave-plates (E) (5), then install the clutch end-
plate (F) with the flat side toward the disc. 


2007 Honda Element EX 

2007-2008 TRANSMISSION Automatic Transmission - Element


Fig. 516: Disassembled View Of 2nd Clutch Drum 
Courtesy of AMERICAN HONDA MOTOR CO., INC. 

15. Install the waved spring (A) in the 3rd clutch drum (B). Install the clutch flat-plate (C), then starting with 

the clutch disc, alternately install the clutch discs (D) (6) and clutch wave-plates (E) (5), then install the 
clutch end-plate (F) with the flat side toward the disc. 

Fig. 517: Disassembled View Of 3rd Clutch Drum 
Courtesy of AMERICAN HONDA MOTOR CO., INC. 

16. Install the waved spring (A) in the 4th clutch drum (B). Starting with the clutch wave-plate, alternately 

install the clutch wave-plates (C) (4) and clutch discs (D) (4), then install the clutch end-plate (E) with the 
flat side toward the disc. 


2007 Honda Element EX 

2007-2008 TRANSMISSION Automatic Transmission - Element


Content   ..  285  286  287  288   ..