Honda Civic. Manual - part 580


  Index      Honda     Honda Civic - service repair manual 2006-2009 year


Search            


Content   ..  578  579  580  581   ..


Honda Civic. Manual - part 580


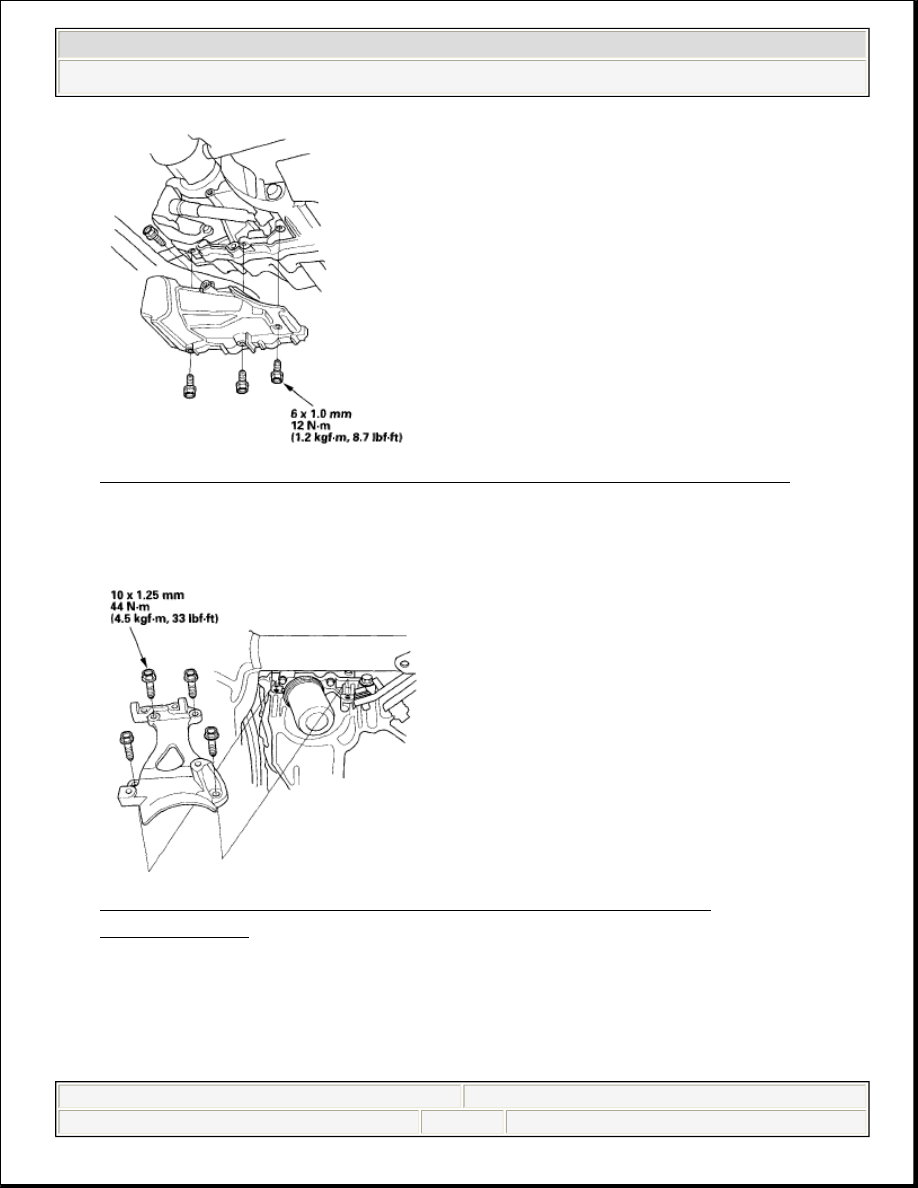
Fig. 71: Identifying Shift Cable Cover (With Torque Specifications) 
Courtesy of AMERICAN HONDA MOTOR CO., INC. 

8. Install the A/C compressor bracket. 

Fig. 72: Identifying A/C Compressor Bracket (With Torque 
Specifications)
 
Courtesy of AMERICAN HONDA MOTOR CO., INC. 

9. Remove the lower torque rod bracket. M/T 


2008 Honda Civic GX 

2006-08 ENGINE Engine Block - Civic (Except Hybrid)


Fig. 73: Identifying Lower Torque Rod Bracket (With Torque 
Specifications)
 
Courtesy of AMERICAN HONDA MOTOR CO., INC. 

10. If the engine is still in the vehicle, do the following steps.  
11. Lower the vehicle on the lift.  
12. Loosen the upper torque rod mounting bolt (see step 6 on ENGINE 

INSTALLATION ).  

13. Raise the vehicle on the lift to full height.  


2008 Honda Civic GX 

2006-08 ENGINE Engine Block - Civic (Except Hybrid)


14. Install the lower torque rod (see step 16 on ENGINE INSTALLATION ).  
15. Lower the vehicle on the lift.  
16. Tighten the upper torque rod mounting bolt (see step 18 on ENGINE 

INSTALLATION ).  

17. Raise the vehicle on the lift to full height.  
18. Install exhaust pipe A (see step 30 on ENGINE INSTALLATION ).  
19. Lower the vehicle on the lift.  
20. Install the A/C compressor. Install the harness clamp, then connect the A/C 

compressor clutch connector (see step 34 on ENGINE INSTALLATION ).  

21. Install the A/C condenser fan shroud (see step 5 on A/C CONDENSER 

REPLACEMENT ).  

22. Install the drive belt (see DRIVE BELT INSPECTION ).  
23. Refill the engine with engine oil (see step 4 on ENGINE OIL 

REPLACEMENT ).  

24. Install the splash shield (see step 31 on ENGINE INSTALLATION ).  

PULLEY END CRANKSHAFT OIL SEAL INSTALLATION - IN CAR 

Special Tools Required  

Oil seal driver 07LAD-PT3010A 

1. Remove the crankshaft pulley (see CRANKSHAFT PULLEY REMOVAL 

AND INSTALLATION ).  

2. Remove the pulley end crankshaft oil seal.  
3. Clean, and dry the crankshaft oil seal housing.  
4. Apply a light coat of multipurpose grease to the crankshaft and to the lip of the 

seal.  

5. Using the seal driver, drive in the crankshaft oil seal until the driver bottoms 

against the oil pump. When the seal is in place, clean any excess grease off the 
crankshaft, and check that the oil seal lip is not distorted. 


2008 Honda Civic GX 

2006-08 ENGINE Engine Block - Civic (Except Hybrid)


Fig. 74: Identifying Special Tool 
Courtesy of AMERICAN HONDA MOTOR CO., INC. 

6. Install the crankshaft pulley (see INSTALLATION ).  

TRANSMISSION END CRANKSHAFT OIL SEAL INSTALLATION - IN CAR 

Special Tools Required  


Driver 07749-0010000  


Oil seal driver attachment 96 07ZAD-PNAA100  

1. Remove the transmission: 


Manual transmission (see TRANSMISSION REMOVAL )  


Automatic transmission (see TRANSMISSION REMOVAL )  

2. M/T model: Remove the pressure plate, clutch disc and flywheel (see 

PRESSURE PLATE AND CLUTCH DISC REMOVAL (5-SPEED 
MODEL)
 ).  

3. A/T model: Remove the drive plate (see DRIVE PLATE REMOVAL AND 

INSTALLATION ).  

4. Remove the transmission end crankshaft oil seal.  
5. Clean, and dry the crankshaft oil seal housing.  
6. Apply a light coat of multipurpose grease to the crankshaft and to the lip of the 

seal.  


2008 Honda Civic GX 

2006-08 ENGINE Engine Block - Civic (Except Hybrid)


Content   ..  578  579  580  581   ..