Honda Civic. Manual - part 577


  Index      Honda     Honda Civic - service repair manual 2006-2009 year


Search            


Content   ..  575  576  577  578   ..


Honda Civic. Manual - part 577


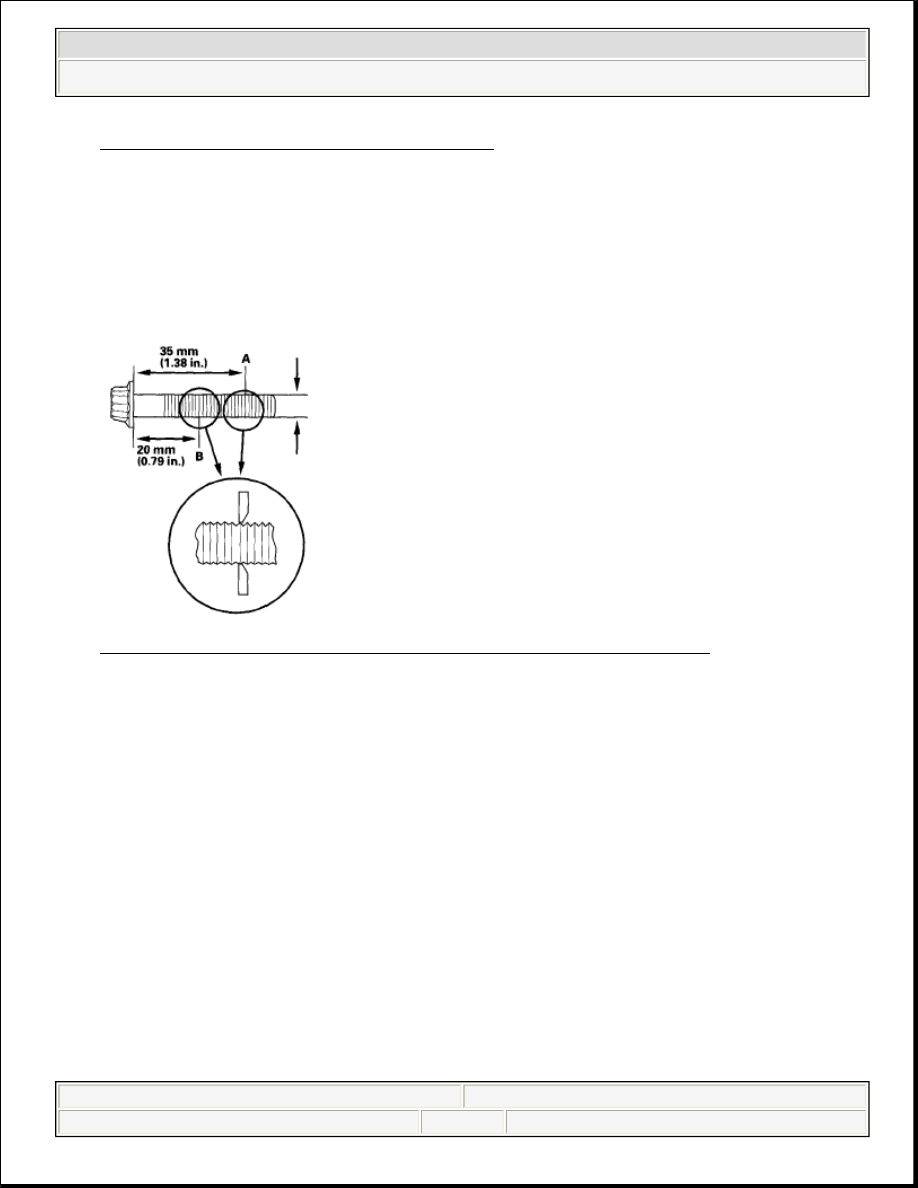
Fig. 52: Positioning Piston In Cylinder 
Courtesy of AMERICAN HONDA MOTOR CO., INC. 

5. Position all pistons at top dead center (TDC).  

CONNECTING ROD BOLT INSPECTION 

1. Measure the diameter of each connecting rod bolt at point A and point B. 

Fig. 53: Identifying Diameter Of Each Connecting Rod Bolt 
Courtesy of AMERICAN HONDA MOTOR CO., INC. 

2. Calculate the difference in diameter between point A and point B. 

Point A-Point B = Difference in Diameter  

Difference in Diameter:  

Specification: 0-0.1 mm (0-0.004 in.)  

3. If the difference in diameter is out of specification, replace the connecting rod 

bolt.  

CRANKSHAFT INSTALLATION 

Special Tools Required  


2008 Honda Civic GX 

2006-08 ENGINE Engine Block - Civic (Except Hybrid)


Driver 07749-0010000  


Attachment, 24 x 26 mm 07746-0010700  


Oil seal driver attachment 96 07ZAD-PNAA100  

1. With a manual transmission, install the crankshaft end bushing when replacing 

the crankshaft. Using the special tools, drive in the crankshaft end bushing 
until the special tools bottom against the crankshaft. 

Fig. 54: Identifying Special Tool 
Courtesy of AMERICAN HONDA MOTOR CO., INC. 

2. Check the connecting rod bearing clearance with plastigage (see 

CONNECTING ROD BEARING REPLACEMENT ).  

3. Check the main bearing clearance with plastigage (see CRANKSHAFT 

MAIN BEARING REPLACEMENT ).  

4. Install the bearing halves in the engine block and connecting rods.  
5. Apply a coat of new engine oil to the main bearings and rod bearings.  
6. Install the crankshaft position (CKP) pulse plate (A) to the crankshaft (B). 


2008 Honda Civic GX 

2006-08 ENGINE Engine Block - Civic (Except Hybrid)


Fig. 55: Identifying Crankshaft Position (CKP) Pulse Plate To Crankshaft 
(With Torque Specifications)
 
Courtesy of AMERICAN HONDA MOTOR CO., INC. 

7. Hold the crankshaft so that rod journal No. 2 and rod journal No. 3 are straight 

up, and lower the crankshaft into the engine block.  

8. Apply new engine oil to the thrust washer surfaces. Install the thrust washers 

(A) in the No. 4 journal of the engine block. 

Fig. 56: Identifying Thrust Washers 
Courtesy of AMERICAN HONDA MOTOR CO., INC. 

9. Inspect the connecting rod bolts (see CONNECTING ROD BOLT 


2008 Honda Civic GX 

2006-08 ENGINE Engine Block - Civic (Except Hybrid)


INSPECTION ).  

10. Seat the rod journals into connecting rod No. 1 and connecting rod No. 4. Line 

up the mark (A) on the connecting rod and cap, then install the caps and bolts 
finger-tight. 

Fig. 57: Identifying Mark On Connecting Rod And Cap 
Courtesy of AMERICAN HONDA MOTOR CO., INC. 

11. Rotate the crankshaft clockwise, and seat the journals into connecting rod No. 

2 and connecting rod No. 3. Line up the mark on the connecting rod and cap, 
then install the caps and bolts finger-tight.  

12. Tighten the connecting rod bolts to 20 N.m (2.0 kgf.m, 14 lbf.ft).  
13. Tighten the connecting rod bolts an additional 90 °. 

NOTE:

Remove the connecting rod bolt if you tightened it 
beyond the specified angle, and go back to step 9 of the 
procedure. Do not loosen it back to the specified angle.


2008 Honda Civic GX 

2006-08 ENGINE Engine Block - Civic (Except Hybrid)


Content   ..  575  576  577  578   ..