Honda Civic. Manual - part 359


  Index      Honda     Honda Civic - service repair manual 2006-2009 year


Search            


Content   ..  357  358  359  360   ..


Honda Civic. Manual - part 359


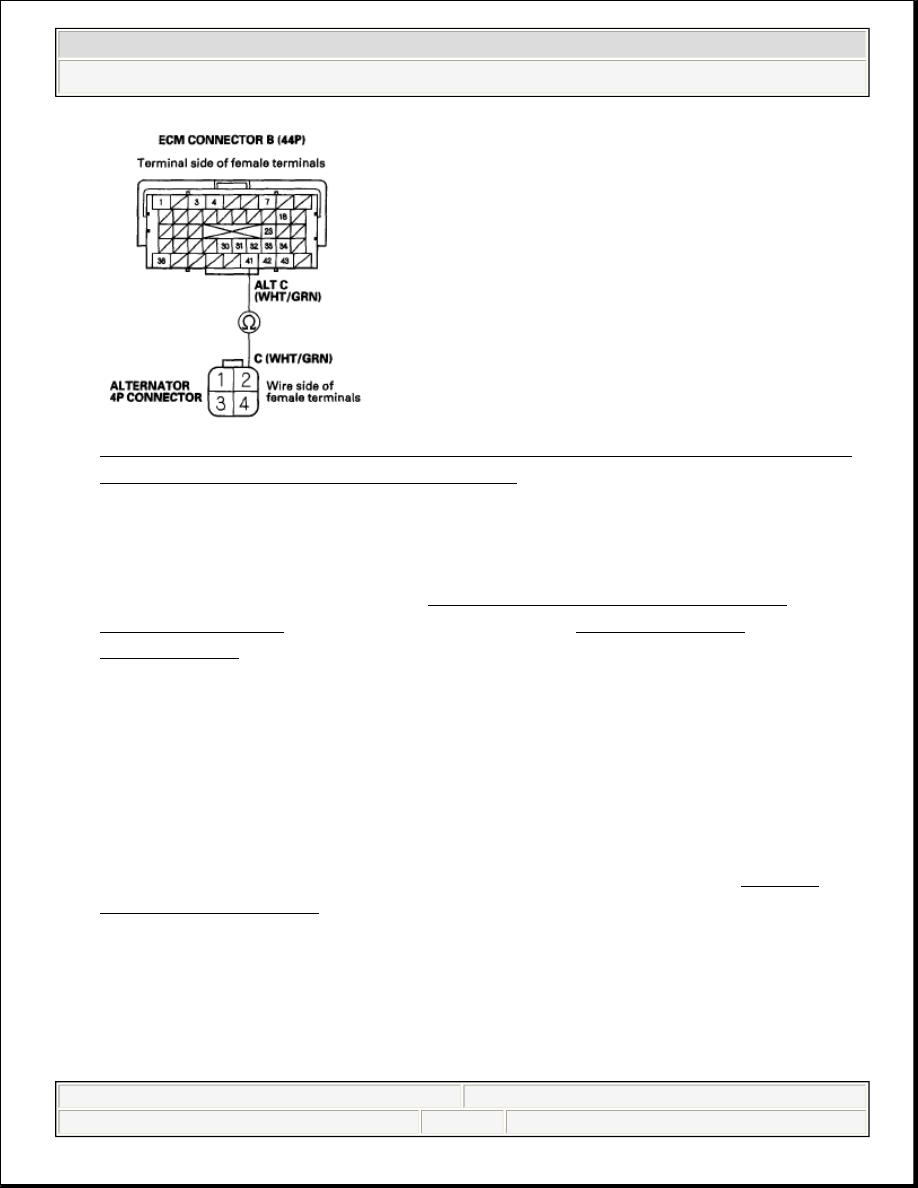
Fig. 9: Checking Continuity Between ECM Connector Terminal B41 And 
Alternator 4P Connector Terminal No. 2
 
Courtesy of AMERICAN HONDA MOTOR CO., INC. 

Is there continuity?  

YES - Replace the alternator (see ALTERNATOR REMOVAL AND 
INSTALLATION
 ), or repair the alternator (see ALTERNATOR 
OVERHAUL
 ). 

NO - Repair open in the wire between the alternator and the ECM. 

DRIVE BELT INSPECTION 

1. Inspect the belt for cracks and damage. If the belt is cracked or damaged, 

replace it.  

2. Check that the auto-tensioner indicator (A) is within the standard range (B) as 

shown. If it is out of the standard range, replace the drive belt (see DRIVE 
BELT INSPECTION
 ). 


2008 Honda Civic GX 

2006-08 ELECTRICAL Charging System (K20Z3) - Civic (All Except Si)


Fig. 10: Checking Auto-Tensioner Indicator Is Within Standard Range 
Courtesy of AMERICAN HONDA MOTOR CO., INC. 

DRIVE BELT REMOVAL/INSTALLATION 

Special Tools Required  

Belt tension release tool Snap-on YA9317 or equivalent, commercially available 

1. Move the auto-tensioner (A) using the belt tension release tool to relieve 

tension from the drive belt, then remove the drive belt. 


2008 Honda Civic GX 

2006-08 ELECTRICAL Charging System (K20Z3) - Civic (All Except Si)


Fig. 11: Moving Auto-Tensioner Using Belt Tension Release Tool To 
Relieve Tension From Drive Belt
 
Courtesy of AMERICAN HONDA MOTOR CO., INC. 

2. Install the new belt in the reverse order of removal.  

DRIVE BELT AUTO-TENSIONER INSPECTION 

Special Tools Required  

Belt tension release tool Snap-on YA9317 or equivalent, commercially available 

1. Turn the ignition switch ON (II), and make sure to turn the A/C switch OFF. 

Turn the ignition switch OFF.  

2. Check the position of the auto-tensioner indicator's pointer (A). Start the 

engine then check the position again with the engine idling. If the position of 
the indicator moves of fluctuates a lot, replace the auto-tensioner (see DRIVE 
BELT AUTO-TENSIONER REMOVAL/INSTALLATION
 ). 

Fig. 12: Checking Position Of Auto-Tensioner Indicator's Pointer 
Courtesy of AMERICAN HONDA MOTOR CO., INC. 

3. Check for abnormal noise from the tensioner pulley. If you hear abnormal 

noise, replace the tensioner pulley.  

4. Remove the drive belt (see DRIVE BELT INSPECTION ).  
5. Move the auto-tensioner within its limit using the belt tension release tool in 

the direction shown. Check that the tensioner moves smoothly and without any 
abnormal noise. If the tensioner does not move smoothly, or you hear abnormal 


2008 Honda Civic GX 

2006-08 ELECTRICAL Charging System (K20Z3) - Civic (All Except Si)


noise, replace the auto-tensioner (see DRIVE BELT AUTO-TENSIONER 
REMOVAL/INSTALLATION
 ). 

Fig. 13: Moving Auto-Tensioner Within Its Limit Using Belt Tension 
Release Tool
 
Courtesy of AMERICAN HONDA MOTOR CO., INC. 

6. Remove the auto-tensioner (see DRIVE BELT AUTO-TENSIONER 

REMOVAL/INSTALLATION ).  

7. Clamp the auto-tensioner (A) by using two 8 mm bolts (B) and a vise (C) as 

shown. Do not clamp the auto-tensioner itself. 


2008 Honda Civic GX 

2006-08 ELECTRICAL Charging System (K20Z3) - Civic (All Except Si)


Content   ..  357  358  359  360   ..