Honda Civic. Manual - part 347


  Index      Honda     Honda Civic - service repair manual 2006-2009 year


Search            


Content   ..  345  346  347  348   ..


Honda Civic. Manual - part 347


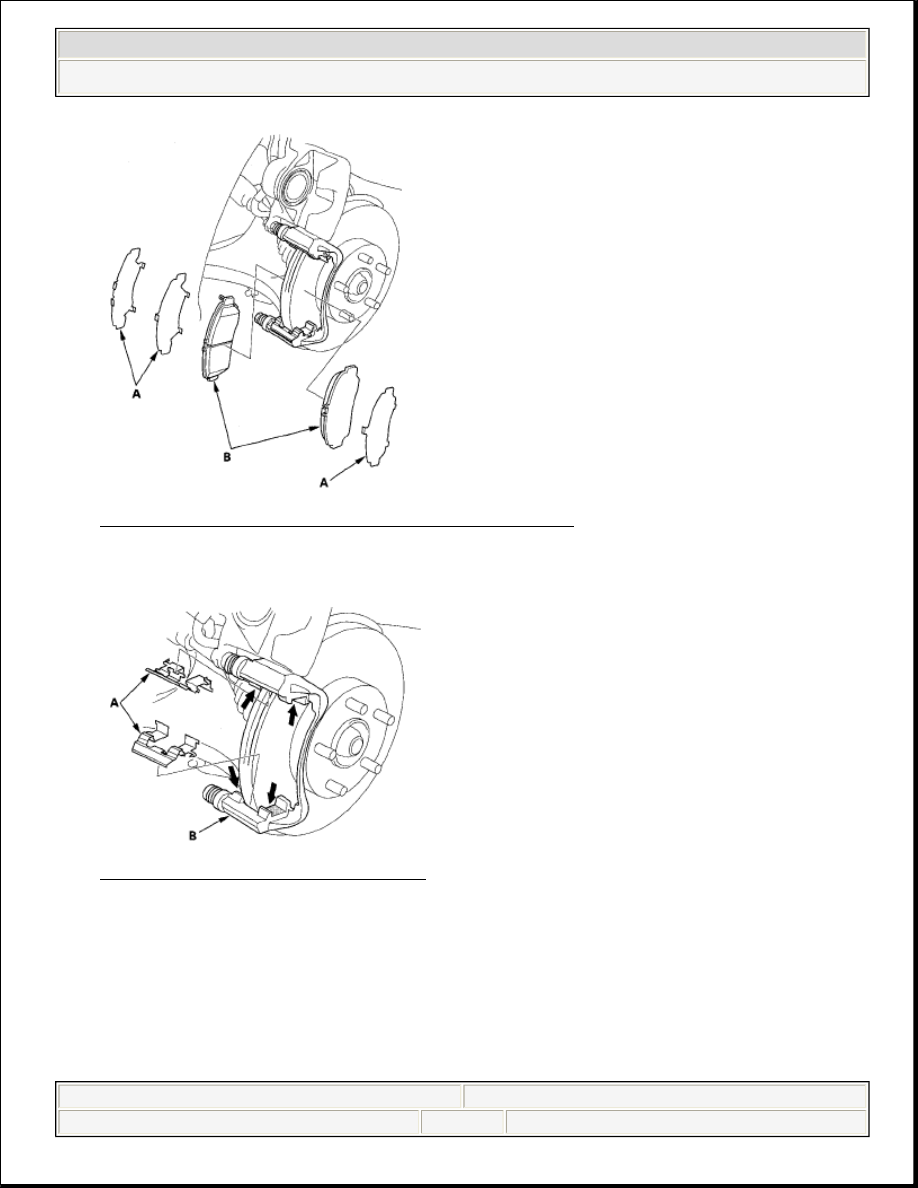
Fig. 5: Identifying Pad Shims And Brake Pads 

6. Remove the pad retainers (A). 

Fig. 6: Removing Pad Retainers 

7. Clean the caliper bracket (B) thoroughly; remove any rust, and check for 

grooves and cracks.  

8. Check the brake disc for damage and cracks.  
9. Apply a thin coat of M-77 assembly paste (P/N 08798-9010) to the retainers on 

their mating surfaces (indicated by the arrows) against the caliper bracket.  

10. Install the pad retainers. Wipe excess assembly paste off the retainers. Keep the 


2008 Honda Civic GX 

2006-08 BRAKES Conventional Brake Components - Civic GX


assembly paste off the discs and pads.  

11. Mount the brake caliper piston compressor (A) on the caliper body (B). 

Fig. 7: Identifying Brake Caliper Piston Compressor On Caliper Body 

12. Press in the piston with the brake caliper piston compressor so the caliper will 

fit over the brake pads. Make sure the piston boot is in position to prevent 
damaging it when pivoting the caliper down. 

13. Remove the brake caliper piston compressor.  
14. Apply a thin coat of M-77 assembly paste (P/N 08798-9010) to the pad side of 

the shims (A), the back of the brake pads (B) and the other areas indicated by 
the arrows. Wipe excess assembly paste off the pad shims and brake pads. 

Contaminated brake discs or brake pads reduce stopping ability. Keep grease 
and assembly paste off the brake discs and brake pads. 

NOTE:

Be careful when pressing in the piston; brake fluid 
might overflow from the master cylinder's reservoir.


2008 Honda Civic GX 

2006-08 BRAKES Conventional Brake Components - Civic GX


Fig. 8: Identifying Brake Pad And Shim 

15. Install the brake pads and pad shims correctly. Install the brake pad with the 

wear indicator (C) on the upper inside. If you are reusing the brake pads, 
always reinstall the brake pads in their original positions to prevent a 
temporary loss of braking efficiency.  

16. Pivot the caliper down into position. Install the flange bolt (A), and tighten it to 

the specified torque while holding the caliper pin (B), with a wrench. Be 
careful not to damage the pin boot. 


2008 Honda Civic GX 

2006-08 BRAKES Conventional Brake Components - Civic GX


Fig. 9: Tightening Flange Bolt (With Torque Specifications) 

17. Press the brake pedal several times to make sure the brakes work. 

18. After installation, check for leaks at the hose and line joints or connections, and 

retighten if necessary. Test-drive the vehicle, then check for leaks, refer to the 
BRAKE HOSE AND LINE INSPECTION .  

19. Add brake fluid as needed.  

FRONT BRAKE DISC INSPECTION 

RUNOUT 

1. Raise the front of the vehicle, and support it with safety stands in the proper 

locations, refer to the VEHICLE LIFT .  

2. Remove the front wheels.  
3. Remove the brake pads (see REPLACEMENT ).  
4. Inspect the brake disc surface for damage and cracks. Clean the brake disc 

thoroughly, and remove all rust.  

5. Install suitable flat washers (A) and wheel nuts (B), and tighten the wheel nuts 

to the specified torque to hold the brake disc securely against the hub. 

NOTE:

Engagement may require a greater pedal stroke 
immediately after the brake pads have been replaced as 
a set. Several applications of the brake pedal will 
restore the normal pedal stroke.


2008 Honda Civic GX 

2006-08 BRAKES Conventional Brake Components - Civic GX


Content   ..  345  346  347  348   ..