Honda Civic. Manual - part 288


  Index      Honda     Honda Civic - service repair manual 2006-2009 year


Search            


Content   ..  286  287  288  289   ..


Honda Civic. Manual - part 288


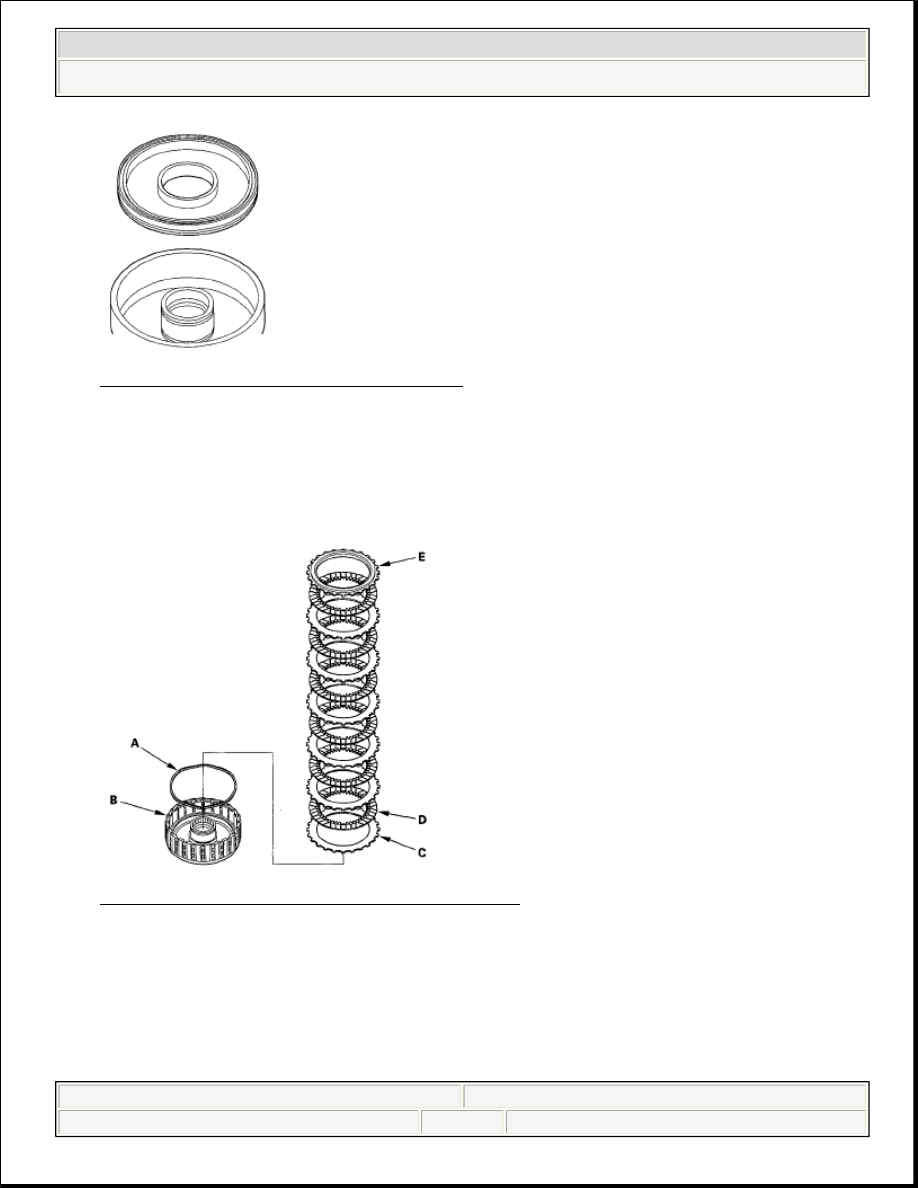
Fig. 444: Identifying Clutch Pistons 
Courtesy of AMERICAN HONDA MOTOR CO., INC. 

3. Install the waved spring (A) in the 1st clutch drum (B). Starting with the clutch 

wave-plate, alternately install the wave-plates (C) (6) and the discs (D) (6). 
Install the clutch end-plate (E) with the flat side down on the top disc. 

Fig. 445: Disassembling 1st Clutch Drum 
Courtesy of AMERICAN HONDA MOTOR CO., INC. 

4. Install the waved spring (A) in the 2nd clutch drum (B). Starting with the 

clutch flat-plate, alternately install the flat-plates (C) (4) and the discs (D) (4). 
Install the clutch end-plate (E) with the flat side down on the top disc. 


2008 Honda Civic LX 

2006-08 TRANSMISSION Automatic Transmission - Civic (Except Hybrid)


Fig. 446: Disassembling 2nd Clutch Drum 
Courtesy of AMERICAN HONDA MOTOR CO., INC. 

5. Install the waved spring (A) in the 4th clutch drum (B). Starting with the clutch 

flat-plate, alternately install the flat-plates (C) (4) and the discs (D) (4). Install 
the clutch end-plate (E) with the flat side down on the top disc. 

Fig. 447: Disassembling 4th Clutch Drum 
Courtesy of AMERICAN HONDA MOTOR CO., INC. 

6. Install the waved spring (A) in the 3rd clutch drum (B). Starting with the clutch 

wave-plate, alternately install the wave-plates (C) (4) and the discs (D) (4). 
Install the clutch end-plate (E) with the flat side down on the top disc. 


2008 Honda Civic LX 

2006-08 TRANSMISSION Automatic Transmission - Civic (Except Hybrid)


Fig. 448: Disassembling 3rd Clutch Drum 
Courtesy of AMERICAN HONDA MOTOR CO., INC. 

7. Install the waved spring (A) in the 5th clutch drum (B). Starting with the clutch 

wave-plate, alternately install the wave-plates (C) (4) and the discs (D) (4). 
Install the clutch end-plate (E) with the flat side down on the top disc. 

Fig. 449: Disassembling 5th Clutch Drum 
Courtesy of AMERICAN HONDA MOTOR CO., INC. 

8. Install the snap ring using a screwdriver to secure the clutch end-plate. 


2008 Honda Civic LX 

2006-08 TRANSMISSION Automatic Transmission - Civic (Except Hybrid)


Fig. 450: Installing Snap Ring 
Courtesy of AMERICAN HONDA MOTOR CO., INC. 

9. Set a dial indicator (A) on the clutch end-plate (B). 

Fig. 451: Setting Dial Indicator On Clutch End-Plate 
Courtesy of AMERICAN HONDA MOTOR CO., INC. 

10. Zero the dial indicator with the clutch end-plate lifted up to the snap ring (C).  
11. Release the clutch end-plate to lower the clutch end-plate, then put the clutch 

compressor attachment on the end-plate (A). 


2008 Honda Civic LX 

2006-08 TRANSMISSION Automatic Transmission - Civic (Except Hybrid)


Content   ..  286  287  288  289   ..