Honda Civic. Manual - part 1067


  Index      Honda     Honda Civic - service repair manual 2006-2009 year


Search            


Content   ..  1065  1066  1067  1068   ..


Honda Civic. Manual - part 1067


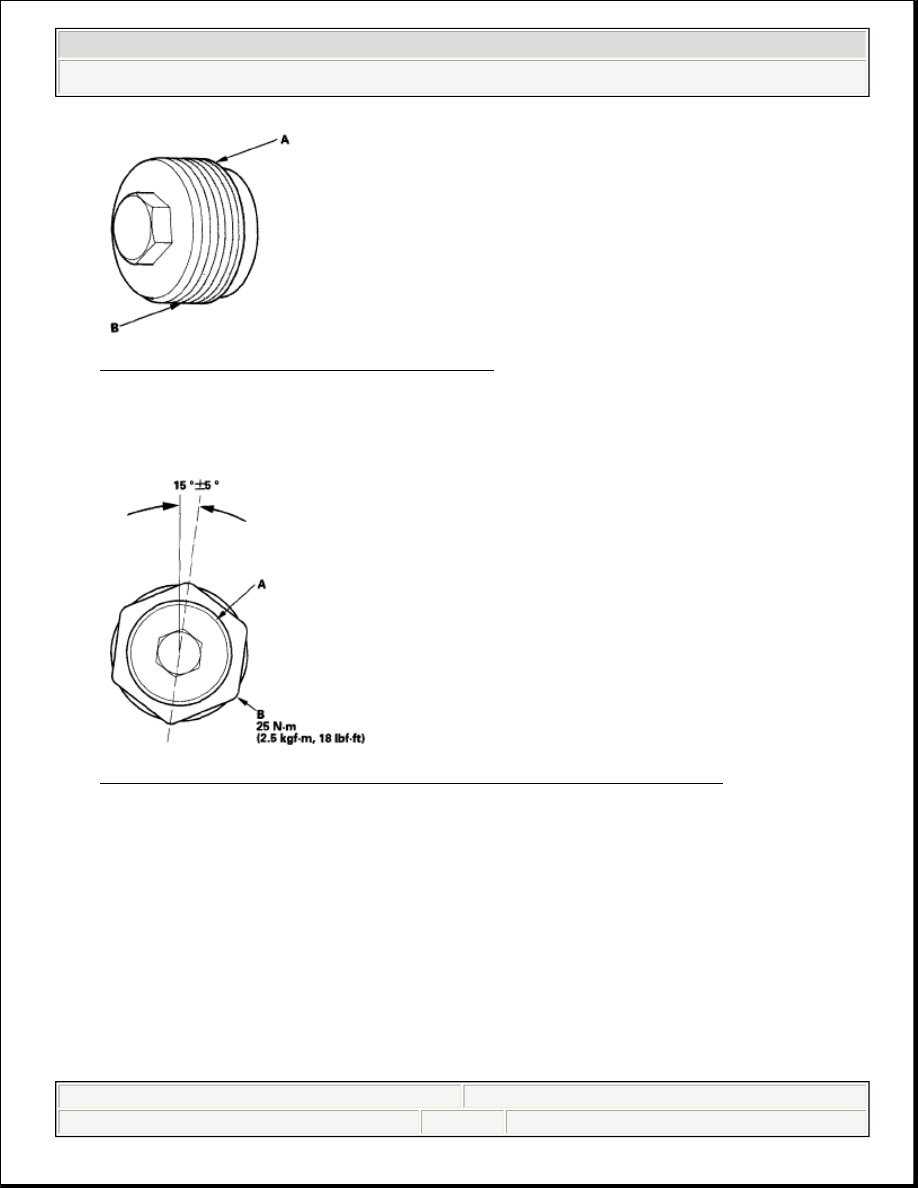
Fig. 28: Identifying Rack Guide Screw 

4. Tighten the rack guide screw (A) to 25 N.m (2.5 kgf.m, 18 lbf.ft), then loosen 

it. 

Fig. 29: Identifying Rack Guide Screw Torque Specifications 

5. Retighten the rack guide screw to 5.9 N.m (0.6 kgf.m, 4.0 lbf.ft), then back it 

off to the specified angle. 

Specified return angle:  

'06 model: 15° ± 5°  

'07-08 model: 10° ± 5°  

6. Hold the rack guide screw stationary with a wrench, and install the locknut (B) 

by hand until it's fully seated.  


2008 Honda Civic EX 

2006-08 STEERING Steering - Civic (All Except Hybrid)


7. Install the locknut wrench on the locknut, and hold the rack guide screw 

stationary with a wrench. Tighten the locknut to the specified torque.  

8. Check for unusual steering effort through the complete turning travel.  
9. Check the steering wheel rotational play (see STEERING WHEEL 

ROTATIONAL PLAY CHECK ), and the power assist (see STEERING 
WHEEL ROTATIONAL PLAY CHECK
 ).  

EPS TYPE 

1. Set the wheels in the straight ahead position.  
2. Loosen the rack guide screw locknut (A) with the locknut wrench, then remove 

the rack guide screw (B). 

Fig. 30: Identifying Rack Guide Screw Locknut, Locknut Wrench & Rack 
Guide Screw
 

3. Remove the old sealant from the rack guide screw (A), and apply new sealant 

(Three Bond 1215 or Loctite 5699) to the middle of the threads (B). Loosely 
install the rack guide screw on the steering gearbox. 


2008 Honda Civic EX 

2006-08 STEERING Steering - Civic (All Except Hybrid)


Fig. 31: Identifying Rack Guide Screw 

4. Tighten the rack guide screw (A) to 25 N.m (2.5 kgf.m, 18 lbf.ft), then loosen 

it. 

Fig. 32: Identifying Rack Guide Screw Torque Specifications 

5. Retighten the rack guide screw to 3.9 N.m (0.4 kgf.m, 2.9 lbf.ft), then back it 

off to the specified angle. 

Specified return angle: 7° ± 3°  

6. Hold the rack guide screw stationary with a wrench, and install the locknut (B) 

by hand until it's fully seated.  

7. Install the locknut wrench on the locknut, and hold the rack guide screw 

stationary with a wrench. Tighten the locknut to the specified torque.  


2008 Honda Civic EX 

2006-08 STEERING Steering - Civic (All Except Hybrid)


8. Check for unusual steering effort through the complete turning travel.  
9. Check the steering wheel rotational play (see STEERING WHEEL 

ROTATIONAL PLAY CHECK ), and the power assist (see STEERING 
WHEEL ROTATIONAL PLAY CHECK
 ).  

TIE-ROD BALL JOINT BOOT REPLACEMENT 

Special Tools Required  

Bushing Base 07JAF-SH20330 

1. Remove the boot from the tie-rod end, and wipe the old grease off the ball pin.  
2. Pack the lower area of the ball pin (A) with fresh multipurpose grease. 

Fig. 33: Identifying Areas For Applying Multipurpose Grease 

3. Pack the interior of the new boot (B) and lip (C) with fresh multipurpose 

grease. 

Note these items when installing new grease: 


Keep grease off the boot mounting area (D) and the tapered section (E) of 
the ball pin.  


Do not allow dust, dirt, or other foreign materials to enter the boot.  

4. Install the new boot (A) using the bushing base. The boot must not have a gap 

at the boot installation sections (B). After installing the boot, check the ball pin 
tapered section for grease contamination, and wipe it if necessary. 


2008 Honda Civic EX 

2006-08 STEERING Steering - Civic (All Except Hybrid)


Content   ..  1065  1066  1067  1068   ..