Porshe 911 (997). Manual - part 602
 

  Index      Hummer     Porshe 911 997 series - service repair manual 2004-2008 year


Search            


Content   ..  600  601  602  603   ..


Porshe 911 (997). Manual - part 602


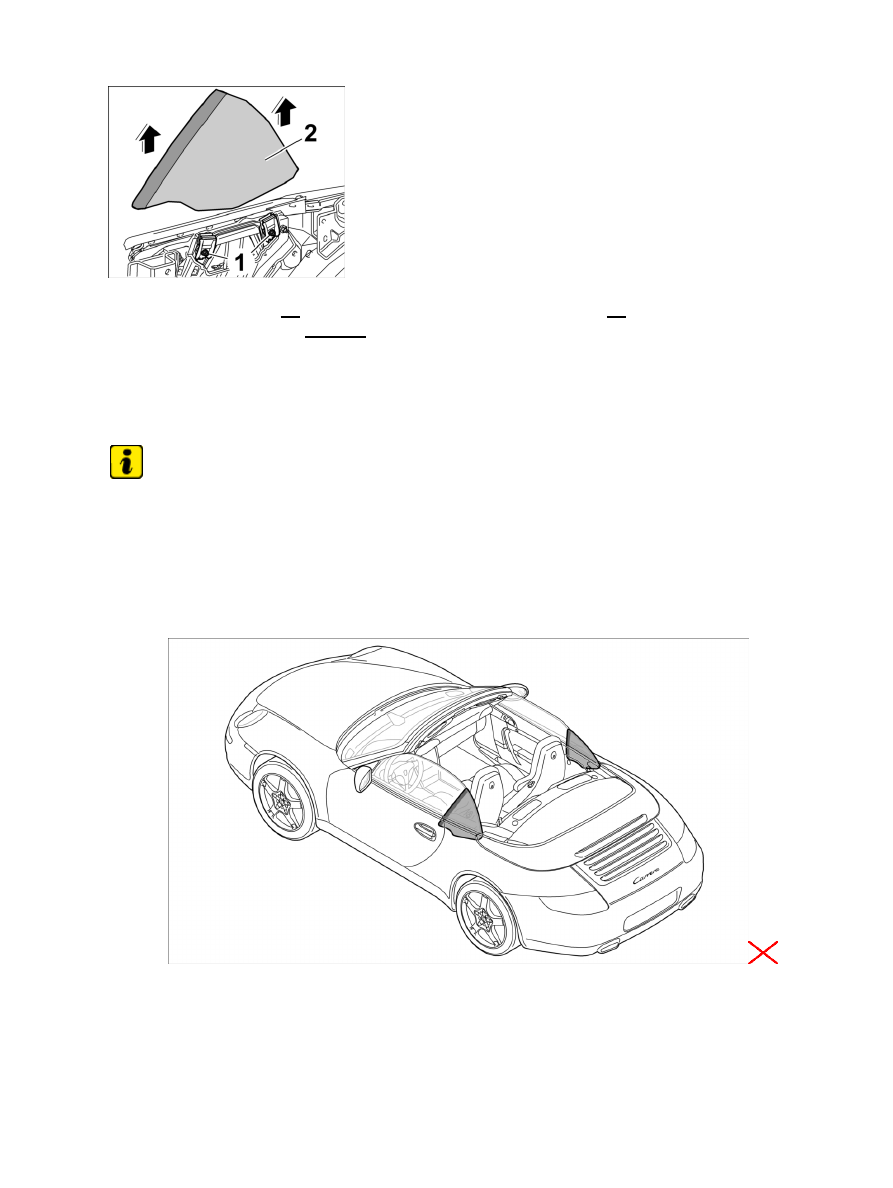
Removing side window

5. Loosen fastening nuts -1- on mounting pieces and remove side window -2- by pulling it up through the

slot in the rear side panel. -arrows-

Installing rear side window

Note

The convertible top must be in service position or fully open in order to fit the side window.

• 

The power window must be in the upper position.

• 

Installation Location:

Installation position of rear side window

Diagnostic system: reading out fault memory and activating systems

Installing rear side window

2565

Installing side window

1. Insert the side window -1- through the side section slot from above and into the clamping jaws -2- of

the front and rear drivers -Arrows- .

Adjusting rear side window

Adjusting the side window angle in the vehicle's longitudinal direction

Note

Moving the side window into the clamping jaws on the receiving rollers equalizes the angle of the side
window with respect to the door window.

• 

The bottom edge of the window must lie against the receiving rollers in the clamping jaws.

• 

1. Adjust the side window in accordance with the contour of the door

window.

→ Gap dimension E: 9 mm +/-1 mm

Adjusting the side window angle

Diagnostic system: reading out fault memory and activating systems

Adjusting rear side window

2566

Securing side window

2. Tighten fastening nuts -arrows- on clamping jaws to secure side window. → Tightening torque:

8.5 (6.3 ftlb.) Nm +/-1.5 (1 ftlb.) Nm

Adjusting the lower stop of the power window unit

Adjusting height of lower stop

Note

It is possible to adjust the height of both lower stops, but these should only be adjusted synchronously.

• 

The adjustment is only possible when the side window is lowered.

• 

3. Insert hexagon-socket wrench -1- from above. Adjust the height by turning the screws -2- .

Installing rear window inner seal

4. Insert rear window inner seal -1- into rear side section slot from above -arrow A- and position on the

convertible top support or belt guide section.

5. Insert and tighten front and rear fastening screws -2- ( -arrows B- ). → Tightening torque: 10 (7.5 ftlb.)

Nm

Diagnostic system: reading out fault memory and activating systems

Adjusting rear side window

2567

Subsequent work

Subsequent work

1. Install rear side trim panel.→ 707519 Removing and installing rear side trim panel - section on

"Installing"

2. End service position.→ 6101IN IN -Convertible top service

position

Note

Only for vehicles with hardtop.

3. Install hardtop. → 610219 Removing and installing hardtop - section on "Installing"

Note

Only for vehicles with hardtop.

4. Adjust the hardtop. → 610215 Adjusting hardtop

997310, 997311, 997320, 997321, 997610, 997611, 997620, 997621

WARNUNG

Gefahr des Verlusts der Text-Bild-Zuordnung beim Ausdruck.

Aus technischen Gründen kann derzeit nicht ausgeschlossen werden, dass trotz
einwandfreier Darstellung auf dem Bildschirm beim Ausdruck der
Zusammenhang von Text und zugehörigem Bild verloren geht.

• 

Wird der Fehler nicht bemerkt, besteht die Gefahr, daß Arbeiten nicht korrekt
durchgeführt werden und es dadurch zu Personen- und Sachschäden kommt.

• 

→ Vergleichen Sie deshalb nach dem Druckvorgang unbedingt die Ausdrucke mit der
Bildschirmdarstellung. Korrigieren Sie die Ausdrucke im Fehlerfall so, daß der Inhalt der
Bildschirmdarstellung zutreffend wiedergegeben wird.

WARNING

Danger of losing text-figure correspondence when printing out.

Diagnostic system: reading out fault memory and activating systems

 Subsequent work

2568


Content   ..  600  601  602  603   ..