Porshe 911 (997). Manual - part 393


  Index      Hummer     Porshe 911 997 series - service repair manual 2004-2008 year


Search            


Content   ..  391  392  393  394   ..


Porshe 911 (997). Manual - part 393


resistance spot-welding are not permitted since the thermal effect would destroy the bonded joint over a
wide area. → 5000IN IN - Processing structural body adhesives - section on "Welding in body
components"

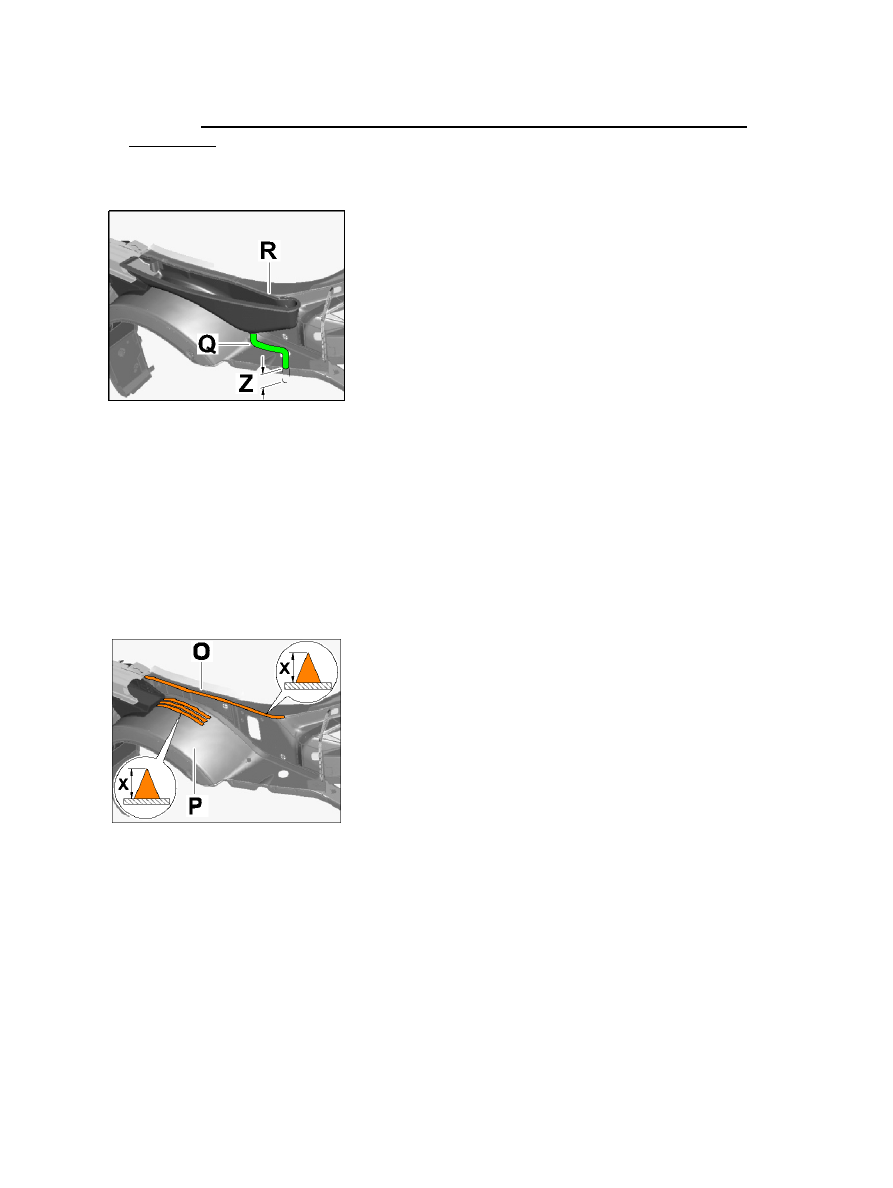
Fitting water drain hose

1. Fitting in water drain hose

Press water drain hose Q through the water drip pan R; observe specified marking. The groove of the
water drain hose must fit all the way around the hole in the water drip pan. Route water drain hose through
the grommet to the wheel housing and cut the hose so that approx. dimension Z = 35 mm projects
outwards.

2. Installing water drip pan

2.1. Apply a triangular bead of body sealant - dimension "X" = approx. 12 mm high - to the inside of

the side section O.

Applying body sealant

Apply a triangular bead of body sealant - dimension "X" = approx. 12 mm high - to the wheel
housing in area P.

Diagnostic system: reading out fault memory and activating systems

Installing side section

1729

Installing water drip pan

Position water drip pan R on the inside of the side section and press on firmly. Route the water drain hose Q.
Apply a triangular bead of body sealant - dimension "X" = approx. 12 mm high - to the outside of the side
section S.

Fitting the seal

3. Installing

seal

3.1. Apply a triangular bead of body sealant Y -dimension "X" = approx. 12 mm high - to all sides of the

seal. Apply seal to the prepared holes on the inside of the side section, position the pins of the seal and
press into place.

4. Applying adhesive to the side section

WARNING

Risk of damage if the processing time is not observed!

The quality of the joint will be affected if the adhesive processing time is not observed.

• 

→ The new part must be welded within 30 minutes in the area of the adhesive, otherwise the adhesion of the

adhesive will be affected.

Diagnostic system: reading out fault memory and activating systems

Installing side section

1730

Applying adhesive to the side section

4.1. Apply a triangular bead of adhesive measuring - dimension "X" = approx. 8 mm - to the inside of the

side section, along the edge of the wheel arch and up to the start of the door sill.

Applying adhesive to the inside of the side section

5. Applying adhesive to the inside of the side section

WARNING

Risk of damage if the processing time is not observed!

The quality of the joint will be affected if the adhesive processing time is not observed.

• 

→ The new part must be welded within 30 minutes in the area of the adhesive, otherwise the adhesion of the

adhesive will be affected.

5.1. Apply a triangular bead of adhesive (Teromix-6700) - dimension "X" = approx. 10 mm high - to the

joint between the light housing and the inside of the side section. The light housing must lie flush with
the inside of the side section.

Applying adhesive to the window slot reinforcement

Diagnostic system: reading out fault memory and activating systems

Installing side section

1731

6. Applying adhesive to the window slot reinforcement

WARNING

Risk of damage if the processing time is not observed!

The quality of the joint will be affected if the adhesive processing time is not observed.

• 

→ The new part must be welded within 30 minutes in the area of the adhesive, otherwise the adhesion of the

adhesive will be affected.

6.1. Apply a triangular bead of adhesive (Teromix-6700) - dimension "X" = approx. 10 mm high - to the

joint between the window slot reinforcement and the side section.

Applying adhesive to the inside of the side section

7. Applying adhesive to the inside of the side section

WARNING

Risk of damage if the processing time is not observed!

The quality of the joint will be affected if the adhesive processing time is not observed.

• 

→ The new part must be welded within 30 minutes in the area of the adhesive, otherwise the adhesion of the

adhesive will be affected.

7.1. Apply a triangular bead of adhesive (Teromix-6700) - dimension "X" = approx. 10 mm high - to the

inside of the side section in area V.

Welding in the side section

8. Welding in the side section

8.1. Secure the side section at the rear with tensioning clamps.

Diagnostic system: reading out fault memory and activating systems

Installing side section

1732


Content   ..  391  392  393  394   ..