Porshe 911 (997). Manual - part 131


  Index      Hummer     Porshe 911 997 series - service repair manual 2004-2008 year


Search            


Content   ..  129  130  131  132   ..


Porshe 911 (997). Manual - part 131


Plastic lines

4. For better access, secure the lines and hoses to one side with a tie-wrap → Plastic lines .

ATTENTION

Material damage through lowering engine

Cables and coolant hoses can be stretched and torn

• 

→ Lower the engine with a jack no more than 40 mm maximum

5. Support the engine with a jack. Unscrew the two collar nuts of the rear engine mounts. Lower the

engine by 30 - 40 mm . Should the period between removal and installation be extended, the engine
must be lifted back into position and temporarily secured with the collar nuts. Attach an appropriate
warning notice.

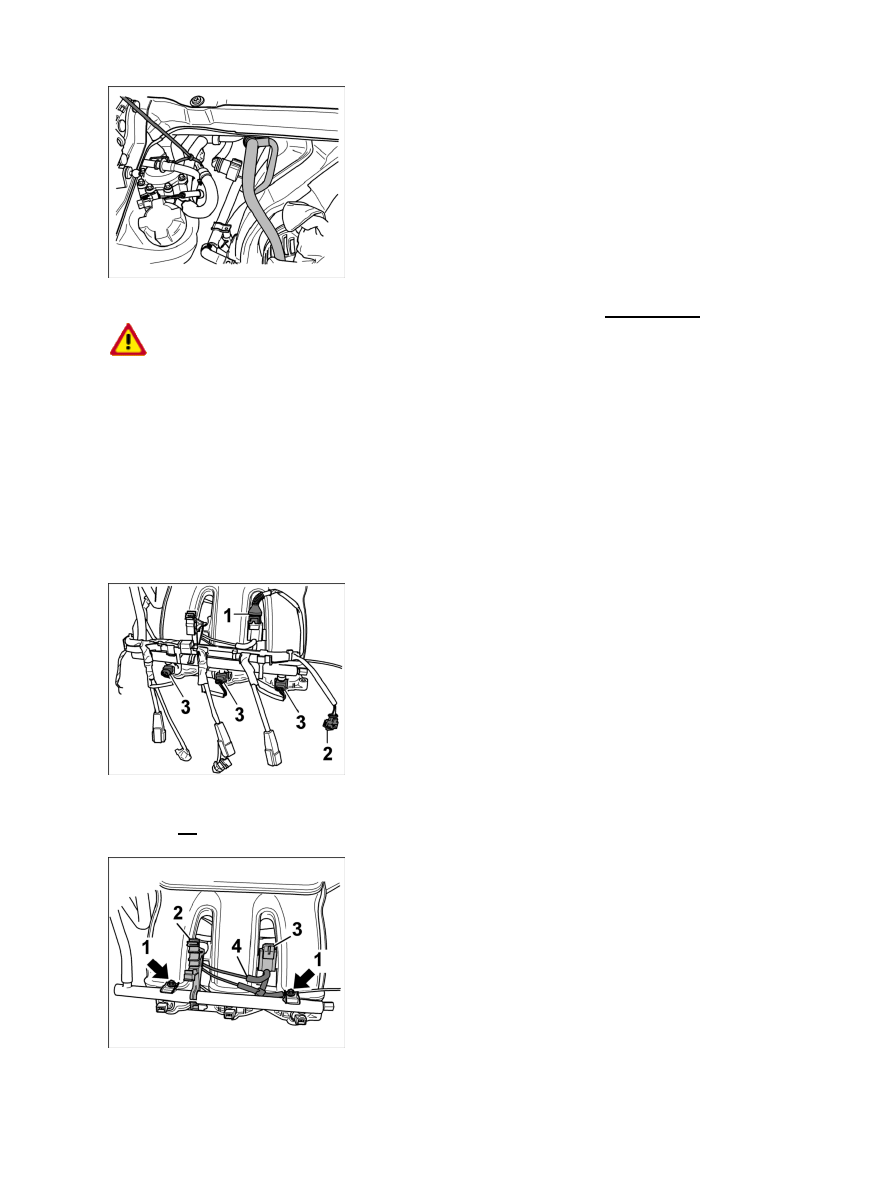
Cable plug for injection valves

6. Remove cable duct on the fuel distributor pipe. To do this, pull cable plug from camshaft position

sensor -2- and lift up cable duct.

Fuel distributor pipe

7.

Diagnostic system: reading out fault memory and activating systems

Removing injection valves of cylinder bank 1-3

681

Remove cable holder -2- . Remove fastening screws for fuel distributor pipe -1- and pull fuel
distributor pipe from the intake distributor.

8. Pull off cable plug for injection valves and release fuel distributor pipe. Push the cable duct to one side.

Warning sign

9. Before opening the fuel lines, put up or attach to vehicle a warning sign in a clearly visible position

→ Warning sign .

Fitting clip

10. Remove sheetmetal clips of the injection valves → Fitting clip and remove the injection valves from the

fuel distributor pipe. Ensure that the sealing rings are present. Because of emerging fuel, place a cloth
underneath.

11. Check sealing rings and replace if necessary.

Removing injection valves of cylinder bank 4-6

WARNING

Danger of injury from hot engine parts.

Risk of burns, damage to skin, injury to the eyes.

• 

→ Do not work on the engine while it is

hot.

1. Remove cable duct on the fuel distributor pipe. To do this, carefully lift up cable duct -cable duct- .

2. Pull off cable plug for injection valves and release fuel distributor pipe. Push the cable duct to one side.

Diagnostic system: reading out fault memory and activating systems

Removing injection valves of cylinder bank 4-6

682

Fuel distributor pipe

3. Remove fastening screws for fuel distributor pipe -1- and pull fuel distributor pipe together with

fitted injection valves from the intake distributor. Check sealing rings of injection valves and replace
if necessary.

Warning sign

4. Before opening the fuel lines, put up or attach to vehicle a warning sign in a clearly visible position

→ Warning sign .

Fitting clip

DANGER

Fuel can escape when fuel line is disconnected.

Risk of fatal injury!

• 

Damage to skin

• 

→ Do not work on fuel system if engine is hot!

→ Do not smoke, avoid fire and naked flames!

→ Wear fuel-resistant protective gloves and goggles.

→ Attach warning sign to vehicle in a clearly visible position.

Diagnostic system: reading out fault memory and activating systems

Removing injection valves of cylinder bank 4-6

683

5. Remove sheetmetal clips of the injection valves and remove the injection valves from the fuel distributor

pipe. Ensure that the sealing rings are present. Because of emerging fuel, place a cloth underneath..

6. Check sealing rings and replace if necessary.

Installing injection valves

Installing injection valves of cylinder bank 1-3

DANGER

Fuel can escape when fuel line is disconnected.

Risk of fatal injury!

• 

Damage to skin

• 

→ Do not work on fuel system if engine is hot!

→ Do not smoke, avoid fire and naked flames!

→ Wear fuel-resistant protective gloves and goggles.

→ Attach warning sign to vehicle in a clearly visible position.

Aligning injection valve

1. Check sealing rings and replace if necessary. Insert injection valves into fuel distributor pipe. Align

lugs of injection valves with fuel distributor pipe (pressure pipe) -arrow- and fit the sheetmetal
clips. Ensure that the sheetmetal clips engage correctly → Fitting clip .

Diagnostic system: reading out fault memory and activating systems

 Installing injection valves

684


Content   ..  129  130  131  132   ..