Porshe 911 (997). Manual - part 108


  Index      Hummer     Porshe 911 997 series - service repair manual 2004-2008 year


Search            


Content   ..  106  107  108  109   ..


Porshe 911 (997). Manual - part 108


Draining coolant

5. Open up the coolant hoses at the supports using a screwdriver and allow the coolant hoses to drain

-arrow-

 . Pull coolant hoses off the supports.

Lower fastening screw

6. Remove M8 x 25 fastening screw on bracket from below at the body
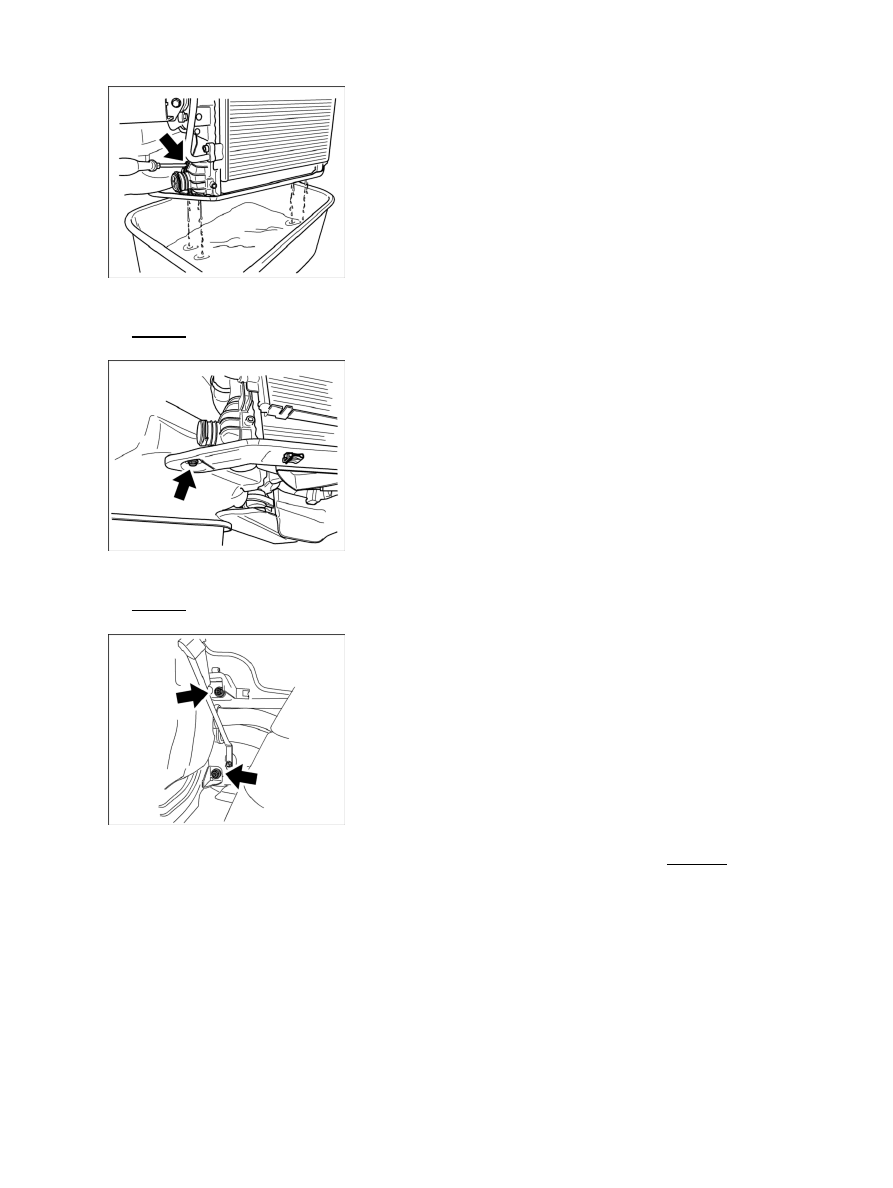
-arrow-

 .

Fastening nuts

7. Undo two M8 fastening nuts on the bracket in the wheel housing at the side wall -arrows- .

Carefully remove side radiator complete with bracket to the side. Collect remaining coolant from
the hoses and side radiator. Air-conditioning condenser remains in installation position.

Diagnostic system: reading out fault memory and activating systems

Removing radiator

589

Bracket for side radiator

8. When the side radiator is removed, remove the sheetmetal clips and washers for the bracket -arrows- .

Carefully pull the side radiator upwards out of the bracket.

Cooling fan

9. Remove two hexagon-head sheetmetal screws at the side -1- and lift cooling fan housing with rear air

guide out of the tabs on the side radiator -2- .

Installing radiator

Installing radiator

Note

The air-conditioning condenser remains in the vehicle. The air-conditioning system is not opened.

Installation Location:

Diagnostic system: reading out fault memory and activating systems

 Installing radiator

590

Installation position

Cooling fan

1. Fit cooling fan housing with rear air guide on side radiator. To do this, push side tabs of cooling fan

housing into the brackets for the side radiator -2- , move housing into installation position and fit
with two fastening screws -1- .

Bracket for side radiator

2. Push radiator module into the radiator bracket. Make sure that the radiator is positioned correctly in the

side guide and in the lower bores. Fit washers and sheetmetal clips on the lower fastening pins of the
radiator in such a way that the sheetmetal clips engage correctly into the pins -arrows- .

Diagnostic system: reading out fault memory and activating systems

Installing radiator

591

Securing hose holder

3. Move side radiator with bracket into installation position. Make sure that the hose holder for the coolant

hoses is inserted correctly into the side bracket. Push side radiator with bracket on to the studs on the side
member and insert fastening screw M6 x 16 (outer torx) for the hose holder -arrow- .

Fastening nuts

4. Position the M8 fastening nuts on the body studs -arrows- .

Lower fastening screw

5. Fit fastening screws to the body from below → Tightening torque: 23 (17) Nm (ftlb.) -arrow- .

6. Tighten the fastening nuts on the body studs → Tightening torque: 23 (17) Nm (ftlb.) . Tighten

fastening screw M6 x 16 (outer torx) for hose holder → Tightening torque: 10 (7.5) Nm (ftlb.) .

Diagnostic system: reading out fault memory and activating systems

Installing radiator

592


Content   ..  106  107  108  109   ..